Mocha Testing: 4 Key Features and a Quick Tutorial

What is Mocha Testing Framework?

Mocha.js is an open source JavaScript unit testing framework that runs in Node.js and executes tests directly in the browser. Mocha supports most assertion libraries, but is typically used in conjunction with Chai for Node.js. 

Its key capabilities include:

  • Ability to test synchronous and asynchronous code with a simple interface.
  • Flexible and accurate reporting
  • Ability to run tests sequentially while detecting uncaught exceptions and mapping them to test cases.
  • Ability to run functions in a specific order and log the results to a terminal window.
  • Automatically cleaning software state so test cases run independently of each other.

In this article:

4 Mocha Features and Functions

1. Configuring Mocha

You can configure Mocha using configuration files in several formats:

  • JavaScript—you can create a .mocharc.js file in your project directory and export an object with your configuration using module.exports.
  • JSON—you can create a .mocharc.json file in your project directory. Mocha allows adding comments in this file, even though they are normally not valid in JSON.
  • YAML—you can create a .mocharc.yaml file with your configuration in your project directory.
  • package.json—you can provide Mocha configuration by adding a mocha property to your package.json manifest.

2. Mocha Hooks

Mocha lets you set up code that defines preconditions for a test, and code that automatically cleans up after your tests. You can do this using synchronous or asynchronous hooks. The most commonly used hooks in Mocha are: before(), after(), beforeEach(), and afterEach().

The basic syntax for Mocha hooks looks like this. You provide an optional description and a function to run at a specified time during the test lifecycle.

before("hook description", function () {
   // runs once before the first test in the block
});

after("hook description", function () {
// runs once after the last test in the block
});

3. Mocha Test Features

Mocha lets you specify in which circumstances tests should or should not be executed. There are three ways to do this:

  • Exclusive tests—append .only() to a function to run only the specified suite or test case.
  • Inclusive tests—append .skip() to a function to ignore certain suites or test cases.
  • Pending tests—test cases that do not have a callback are still included in the test results, but marked as “pending”, to remind the team that someone needs to write these tests. Pending tests are not considered failed. 

4. Mocha Parallel Tests

Mocha provides the –parallel flag, which allows you to run tests in parallel to improve performance. However, there are a few important considerations you should be aware of:

  • Reporter limitations—some reporters do not work when tests are run in parallel, because they need to know in advance how many tests Mocha plans to run (which is not available in parallel mode). In particular, markdown, progress, and json-stream will not work when tests run in parallel. 
  • Exclusive tests not supported—you cannot use .only() when running tests in parallel mode.
  • No guarantee on test order—when running in parallel, Mocha does not guarantee the order in which tests run, and which worker will process them. Options like -file, -sort, and -delay will therefore not work.
  • Test duration—when you run tests in parallel, it might take more time to perform certain operations, and typically more time will be needed to run individual tests.

Related content: Read our guide to cypress testing.

Mocha Tutorial: Unit Testing with Mocha and Chai

Chai is an assertion library that comes in handy when unit testing with Mocha. Tests can use functions from Chai to check the expected output of functions against what it is currently returning.

Installing Node.js and Mocha

To install Node.js and Mocha on the machine:

  1. Download and install Node.js with the package manager npm from this official link.
  2. Check for successful installation of Node.js and npm through the following command. It shows the installed versions of both technologies.

node -v
npm -v

  1. Use npm to install Mocha and Chai through the following command. The –save-dev flag installs required dependencies of the libraries.

npm install mocha --save-dev
npm install chai --save-dev

Setting Up Test Files And Folders

To create and organize test files:

  1. Create a dedicated folder called /tests in the project’s root directory. This folder will contain all the test module files and code functions.
  2. The main codebase files should be in the project’s root directory. This tutorial creates a demo multiplication function for testing purposes, shown below. This function is in a file called multiply.js.

function multiply(number_1, number_2){
    return number_1 + number_2;
}

  1. Create your tests in the /tests directory. The tutorial uses a sample test function in a file named multiplyTest.js that tests the demo multiplication function.

var assert_function = chai.assert;
describe("multiply", function() {
  it("multiplies numbers", function() {
       assert_function.equal(multiply(6, 3), 18);
  });
});

The assertion here specifies what inputs to pass for multiplication and what output to check for.

Related content: Read our guide to junit testing.

Running Tests

To run your tests and see results on a test page:

  1. Create an HTML page where you can run tests and see the outcome through a browser. Code for a sample test page is shown below.


    Demo Testing Page With Mocha


This HTML page uses Mocha’s provided CSS files. The Mocha.run() line runs Mocha and the scripts we have specified. The code with setup() specifies that test functions use the Behavior-Driven Development (BDD) approach. This approach requires naming the function and describing it. Then, the expected behavior of the function is specified for testing.

  1. Put the HTML page code above in a file title testPage.html and place it in the root directory.
  2. Go to a browser and open testPage.html. It will run Mocha, Chai, and the test scripts specified in the HTML code. The outcome on the HTML page is categorized according to test functions.

Note: This tutorial shows sample code that describes how to arrange files and write tests with Mocha and Chai. However, when working on production-level code, one should ensure that their test functions are comprehensive and offer optimal coverage. Always check the expected behavior of the code in different environments and edge cases. 

Security Unit Testing with Bright Security 

Bright is a developer-first Dynamic Application Security Testing (DAST) scanner, the first of its kind to integrate into unit testing, letting you shift security testing even further left. 

You can now start to test every component / function at the speed of unit tests, baking security testing across development and CI/CD pipelines to minimize security and technical debt, by scanning early and often, spearheaded by developers. 

With NO false positives, start trusting your scanner when testing your applications and APIs (SOAP, REST, GraphQL), built for modern technologies and architectures. 

Sign up now for a free account or read our docs to learn more.

Deserialization: How It Works and How to Protect Your Apps

What Is Deserialization?

Insecure deserialization vulnerabilities involve the use of unknown or untrusted data and can result in attacks such as denial of service (DoS), malicious code execution, bypassing authentication measures or other abuses of application logic.

Deserialization is the process of extracting data from files, networks or streams and rebuilding it as objects—as opposed to serialization which involves converting objects to a storable format. A serialized object may be structured as text (i.e. YAML, JSON, XML, etc). 

Both serialization and deserialization are considered safe web application processes and are commonly used. However, deserialization of user inputs is considered a security misconfiguration, and can have serious consequences.

If the deserialization process is not adequately secured, attackers can exploit it to inject a malicious serialized object into an application, where the target computer deserializes the malicious data. Attackers can use insecure deserialization as an entry point to a system, from which they can pivot to further attacks.

This is part of an extensive series of guides about Cybersecurity.

In this article:

Types of Insecure Deserialization

The three main types of insecure deserialization attacks are:

  • Blind deserialization—these attacks occur behind a restricted system or network protected by a firewall and benefiting from robust security management policies. The attacker exploits the Java payload or manipulates a transformer chain to enable remote code execution (RCE).
  • Asynchronous deserialization—these attacks involve storing serialized gadgets in a database. When target web applications initiate deserialization, a chain of gadgets programmed to manipulate the deserialization process is executed in a JMS broker client library. JMS libraries can be vulnerable, including Oracle OpenMQ, IBM WebSphereMQ, Apache QPID JMS, Pivotal RabbitMQ and Oracle Weblogic.
  • Deferred-execution deserialization—these attacks involve the execution of a gadget chain (or chains) into vulnerable applications after the deserialization process. A gadget chain is a sequence of return-oriented programming (ROP) gadgets ending in return-from-procedure (RET) instructions. This allows an attacker to bypass any non-executable protections like kernel-code cohesion and read-only memory protections. ROP gadgets don’t require injecting binary code, so an attacker only needs to link an executable address to the required data arguments to enable code execution. 

Deserialization Attack Examples

The following examples were shared in the OWASP project’s deserialization advisory. 

Deserialization Using JFrame Object

A deserialization vulnerability was discovered in Adobe BlazeDS, a Java remoting and web messaging technology, and added to the Common Vulnerabilities and Exposures database as CVE-2011-2092. It has since been patched. 

Vulnerable versions of BlazeDS allow users to specify classes and properties which BlazeDS applications should deserialize. Attackers used this capability to create a JFrame object on a target BlazeDS server, which causes the JVM to exit when a user closes it. The JFrame could be used to run other malicious code on the target server.

Reading Object from Untrusted Source

The following Java code reads an object, without validating its source or sanitizing its contents, and casts it to an object. Because the casting operation happens only after deserialization, attacks may occur during the deserialization process. 

Attackers can customize deserialization protocols—for example, by overriding the readObject() function of the Java Serializable class—to achieve remote code execution in most Java applications.

Denial of Service Attack via Deserialization Loop

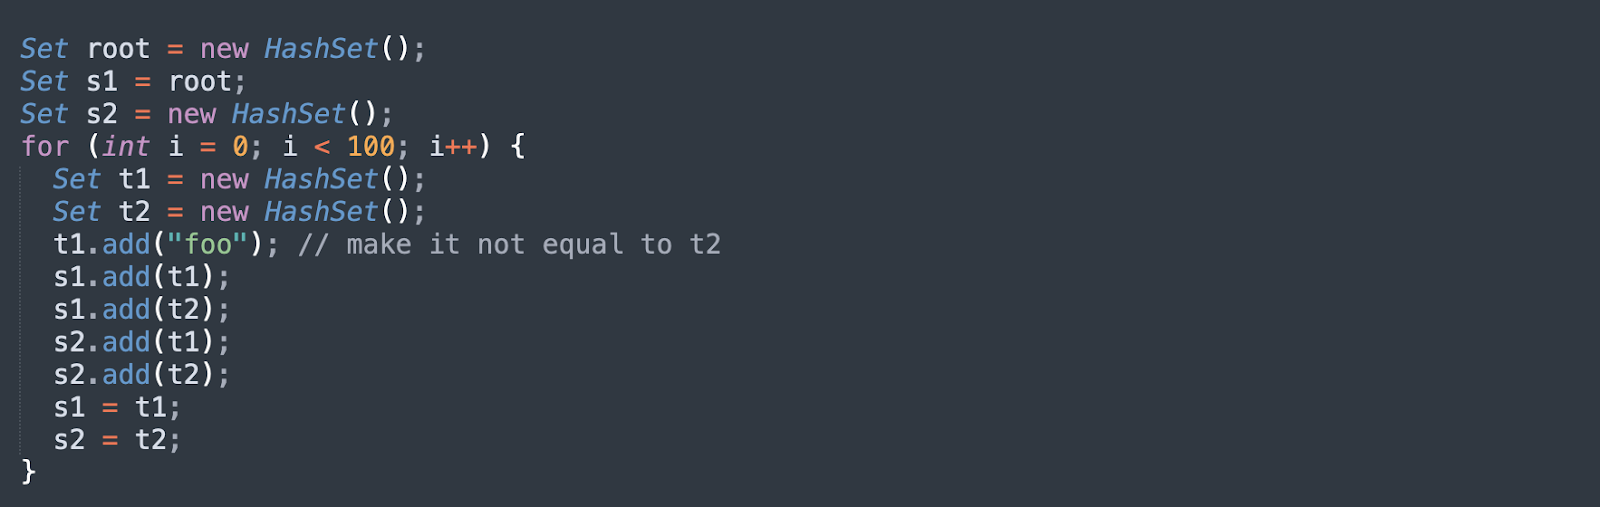
The following code performs a denial-of-service (DoS) attack that leverages deserialization. The root object is crafted in such a way that its members are linked together in a loop. If the application attempts to deserialize this object, the JVM will run through a recursive compute graph which never ends, and will consume 100% of CPU resources. 

How to Protect Applications Against Insecure Deserialization

There is no single solution for protecting your web applications against every kind of insecure deserialization attack. Even if you prevent deserialization of an application according to its own logic, this will not eliminate the threat altogether, given that many other components in your application stack (such as an external library) will still use a deserialization process.  

Using a WAF

There are some web application security tools that can help protect against insecure deserialization attacks, such as a web application firewall (WAF), whitelisting and blacklisting. However, each security solution also has its disadvantages, given the requirement for significant manual intervention (such as pentesting) and complex management. 

For example, a WAF is effective in restricting HTTP traffic, but it will generate large volumes of false positives. It can be difficult and expensive to maintain a WAF throughout the lifecycle of an application. Approaches such as whitelisting and blacklisting to restrict network traffic require constant maintenance and policy updates. Blacklists can produce dangerous false negatives, while whitelists can produce time-consuming false positives. 

Avoid native formats

Another risk reduction strategy is to avoid the use of native formats for deserialization—for example, you can use data-only or language-agnostic formats to make it harder for attackers to exploit deserialization logic. The only way to ensure complete protection against insecure deserialization attacks is to reject any serialized objects from an unvetted source (or to accept only the serialized objects derived from a primitive data type).

Using RASP

Runtime application self-protection (RASP) is an important DevSecOps component and embeds security in the software. RASP can detect and block attempted exploits, including insecure deserialization. It is fixed as a server-side process in the application, it monitors application behavior to identify, prevent and mitigate attacks, with no manual intervention required.    

How to Prevent Insecure Deserialization Vulnerabilities

The deserialization of user input potentially enables severe exploits that are difficult to protect against, so you should generally avoid it unless strictly necessary. In cases that do require deserialization of data from an unknown or untrusted source, you should incorporate additional security measures to verify that the data has not been manipulated by an attacker:

  • Verify data integrity by implementing a digital signature, although this only works if checks are carried out before the deserialization process begins.
  • Avoid using generic deserialization methods where possible. Serialized data often includes private fields containing sensitive information, so it is recommended you control the exposure of various fields. You can do this by creating your own serialization method that is class-specific.
  • Focus on sanitizing inputs. It is not realistic to plug every gadget chain, given the likely complexity of the cross-library dependency structure. Your application could be vulnerable at any given time, given the potential for corruption exploits of memory, which may be publicly documented. Always focus your prevention efforts on the actual vulnerability that needs to be addressed – deserialization of user input. 

Related content: Read our guide to deserialization in java.

See Additional Guides on Key Cybersecurity Topics

Together with our content partners, we have authored in-depth guides on several other topics that can also be useful as you explore the world of cybersecurity.

Device42

Authored by Faddom

API Security

Authored by Radware

DAST

Authored by Bright Security

8 Free Security Testing Tools You Must Know About

What are Security Testing Tools?

In the software world, security testing involves testing a software application to identify vulnerabilities and misconfiguration that could be exploited by an attacker. These could be as simple as a default admin password, or as complex as an injection vulnerability deep in the application code. 

The objective of security testing is not only to discover vulnerabilities but also to provide clear, actionable information on how to remediate them and prevent future attacks. Ideally, security testing should happen early in the development lifecycle – this can prevent security issues from ever reaching a production environment, and also makes these issues simpler and less expensive to fix. This pattern is known as shifting security left.

There are many types of security testing – we’ll introduce powerful security tools from each of these categories:

In this article, we cover the following security testing tools:

1. Bright Security
2. OWASP ZAP
3. Wapiti Scanner
4. Arachni
5. Vega Scanner
6. BeEF (Browser Exploitation Framework)
7. Wfuzz
8. Nogotofail

1. Bright Security

Deployment model: on-premise and cloud

Learn more: Bright Security DAST

Bright Security is a security testing platform that can scan web applications, APIs (REST/SOAP/GraphQL) to help enhance DevSecOps and achieve regulatory compliance. The platform provides real-time, actionable reports of vulnerabilities, with zero false positives. In addition, its ML-based DAST solution provides an automated solution to identify business logic vulnerabilities.

Bright Security empowers developers to incorporate DAST into their unit testing process so they can resolve security concerns as part of an agile development process. The Bright DAST platform integrates into the SDLC fully and seamlessly: 

  • Test results are provided to the CISO and the security team, providing complete visibility into vulnerabilities found and remediated
  • Tickets are automatically opened for developers in their bug tracking system so they can be fixed quickly

Start testing with Bright Security today – get a free account

2. OWASP ZAP

Deployment model: on-premise

GitHub: https://github.com/zaproxy/zaproxy 

OWASP ZAP (short for Zed Attack Proxy) is an open source web application security scanner. It was named a “flagship project” in the Open Web Application Security Project (OWASP). It is intended both for users who are new to application security and professional penetration testers.

ZAP can be used as a proxy server, allowing users to manipulate traffic flowing through the tool, including HTTPS traffic. It can also run in daemon mode, controlled via the REST API.

Key features include:

  • GUI control panel
  • Traditional and AJAX web crawlers
  • Automatic active and passive scanning
  • Forced browsing
  • Fuzzing
  • WebSocket scanning support
  • Support for multiple scripting languages
  • Support for Plug-n-Hack via its plugin-based architecture
  • Online free marketplace where the community can add features

3. Wapiti Scanner

Deployment model: on-premise

GitHub: https://github.com/wapiti-scanner/wapiti 

Wapiti is a command-line application that crawls web pages and searches for scripts or forms that enable user inputs and could be vulnerable to attack.

It is a black box vulnerability scanner that scans pages of a deployed web application from an attacker’s perspective, extracts links and forms, and attempts to access them in randomized ways using a fuzzer. It delivers malicious payloads and looks for error messages, special strings, or unusual behavior that can be exploited by attackers.

Key features include:

  • Vulnerability reports in HTML, XML, JSON, TXT, and CSV formats
  • Ability to pause and resume a scan or attack (based on sqlite3 sessions)
  • Color coding in terminal outputs to highlight vulnerabilities
  • Multiple levels of verbosity in reporting
  • Easy enabling or disabling of attack modules
  • Easily adding payloads by appending a line to a text file
  • Configurable level of concurrency for HTTP requests

Learn more in our detailed guide to mobile security.

4. Arachni 

arachni

Deployment model: on-premise

GitHub: https://github.com/Arachni/arachni 

Arachni is a web application security scanning tool written in Ruby. It enables auditing and inspection of client-side code through an integrated browser environment, and supports complex web applications that make use of technologies like HTML5, JavaScript, AJAX, HTML5, and DOM manipulation.

While scanning, Arachni monitors and learns various factors about how your web application behaves, assesses the reliability of results, and intelligently identifies false results. Unlike other scanners, it takes into account the dynamic nature of a web application and can detect and adapt accordingly to changes in the path web application’s execution paths. This allows for detection of attack and input vectors that typically only humans can detect.

Arachni covers a wide variety of use cases, including:

  • Simple command-line scanner utilities
  • High-performance scanner grids
  • Scripted auditing
  • Multi-user multi-scan collaboration

5. Vega Scanner

Vega

Deployment model: on-premise

GitHub: https://github.com/subgraph/Vega 

Vega is an open source security scanner and security testing platform for web applications, written in Java. It includes an automated scanner for quick testing, and an intercepting proxy for tactical inspection. It provides a GUI interface and runs on Linux, OS X/MacOS, and Windows. It can be extended using a JavaScript-based API.

Vega helps find and verify vulnerabilities such as:

  • SQL injection
  • Reflected and stored cross-site scripting (XSS)
  • Unintentional disclosure of secrets
  • Remote file inclusion (RFI)
  • Shell injection
  • Weaknesses in SSL/TLS security settings

6. BeEF (Browser Exploitation Framework)

Deployment model: on-premise

GitHub: https://github.com/beefproject/beef 

BeEF stands for Browser Exploitation Framework. It is a penetration testing tool focused on web browsers. BeEF enables expert penetration testers to use client-side attack vectors to evaluate the security mechanisms of a protected environment. 

Unlike other security frameworks, BeEF looks for potential exploits in the context of a common attack vector: the web browser. It connects to one or more web browsers and uses them to execute command modules and attempt attacks against the network perimeter and client systems.

Related content: Read our guide to websocket security.

7. Wfuzz

Deployment model: on-premise

GitHub: https://github.com/xmendez/wfuzz 

Wfuzz makes it possible to evaluate web applications in a flexible way by injecting payloads (arbitrary inputs which can come from any data source) into any field of an HTTP request. This allows sophisticated attacks against various web application components such as URL parameters, authentication, forms, directories, files, and HTTP headers.

Key features include:

  • Application vulnerability scanner and ability to exploit vulnerabilities in web applications.
  • Modular plugin framework that makes it easy for Python developers to contribute new plugins.
  • Simple language interface to previous HTTP requests or responses, whether performed by Wfuzz or other tools like Burp Suite. This enables both manual and semi-automated testing, with full control over every step of the testing process, and without reliance on the underlying web application scanner.

8. Nogotofail

Deployment model: on-premise

GitHub: https://github.com/google/nogotofail 

Nogotofail is a tool that secures applications against known SSL/TLS vulnerabilities and misconfigurations. It can be used to test network security issues on any device that relays or processes network traffic. 

Nogotofail runs on Android, iOS, Linux, Windows, Chrome OS, OS X/MacOS, and almost any device with Internet connectivity. It provides a client that lets you configure settings and receive notifications on both Android and Linux. The attack engine itself can be deployed as a router, VPN server or proxy.

Its primary use cases are:

  • Finding bugs and vulnerabilities in networks
  • Verifying fixes and identifying regressions in a network environment
  • Mapping out network data flows and understanding which applications and devices are generating traffic

Conclusion

Security testing should be a critical part of any organization’s cybersecurity strategy. While in the past security testing was a one-time, annual, or quarterly activity, usually conducted as a formal penetration test, organizations are increasingly adding security testing into their day-to-day routine. 

In a DevSecOps organization, security tests do not happen once per quarter – they happen many times a day. Ideally, every code change by a developer should undergo security testing, even before it is committed to a code repository. Every build created by a continuous integration (CI) server should undergo automated security testing as part of its initial sanity check.

Learn how Bright Security is helping make this vision possible

Pen Testing With Python: Pros and Cons

Table of Content

  1. What is Pen Testing?
  2. Should I Use Python for Pen Testing?
  3. Python Pen Testing Examples
  4. Conclusion

What is Pen Testing?

Pen Testing is a process of protecting your system from cyber attacks. This is achieved by executing various malicious programs in order to exploit and learn about any possible vulnerabilities that might occur on your system. 

These can be performed manually or automatically, but the idea remains the same – to test and safely exploit all vulnerabilities on your system. 

The process of penetration testing is carried out by ethical hackers. As the name itself suggests, these are hackers who know how the attacker might think, and thus they can come up with a solution to defend and protect against malicious activities.

Should I Use Python for Pen Testing?

Python is perhaps the most used programming language when it comes to pen testing. This is partly because there is an enormous amount of external python libraries available. These libraries make life that much easier for the pentester. 

Another bonus of using Python is its simplicity. While most programming languages require extensive research in order to catch up with the basics, that’s not the case with Python. It’s a pretty intuitive and well-designed language, allowing you to quickly catch up with some more complex ideas and implementations of it. 

Not only that, but if you’re using it properly, Python can be extremely fast in its execution, making a big difference in the long run, especially on a large-scale project.

Pen Testing Attacks and Exploits with Python

As we explained in the previous sections, Python should be your go-to programming language if you want to try your hand at pen testing. 

What’s important with pen testing attacks when using python is that you follow the plan at all times. It usually consists of four different phases, which are:

  • Planning phase
  • Discovery phase
  • Attack phase
  • Reporting phase

The first phase is preparing the groundwork for the attack. This means defining the scope of your attack and the general idea and the goal behind it. 

The discovery phase – also known as fingerprinting – really speaks for itself. The idea is to find out as much as possible about the system you want to penetrate. This part is mostly research in order to find out the potential weaknesses of the system. 

Attack phase means that you’re launching an attack on vulnerable parts of the system and extracting as much data as possible.

And, of course, the reporting phase means that you compile a report of all potential and existing vulnerabilities. Every report has to be very detailed and specific, otherwise it won’t help much with the further protection of the system.

Python Pen Testing Examples

Pen testing with Python gives you an unlimited array of possibilities. This means that you can be very creative in finding different ways of approaching a problem of penetration testing. 

The first thing you should do when pen testing with python is to look into the existing libraries that will make your life much easier. Here are some of the most popular tools that you can use for this purpose:

  • Python Nmap – helps you easily manipulate nmap scan results
  • BeautifulSoup – used to launch attacks against web applications. BeautifulSoup helps you to quickly identify the crucial parts of the response
  • Scapy – supports developing and transmissions of custom network packets, utilizing exploitation over the network
  • Monda – creates ready-made code that you can use for exploits and simplifies many smaller tasks in the process

One thing that might help you out a lot when pen testing with Python is knowing some other languages so you could ease the process for yourself. JavaScript knowledge could come in handy once you get to pen testing web applications as it allows you to quickly identify and understand the application you’re attacking with your python code. 

Conclusion

If you’re serious about penetration testing, then python is the way to go. With its endless libraries, it ensures you have all the tools you need at your disposal. Not only that, but it’s the most popular pen testing language out there. So, even if you get stuck along the way, there’s always help available on the internet. 

If you prefer automated pentesting, then look no further than Bright! You can sign up for a free account today, and get started immediately because our application is well-suited for developers, meaning that you don’t have to have in-depth knowledge of web security in order to keep your application secure. 

How to Test for Cross-Site Request Forgery

What is Cross-Site Request Forgery Test?

Cross-Site Request Forgery (CSRF) testing is the procedure of finding and remediating CSRF vulnerabilities in web applications. A CSRF attack tricks users into submitting a malicious request. By performing a CSRF attack, the attacker inherits the identity and privileges of the victim to perform an undesired function on behalf of the victim. For most sites, the browser requests automatically include any credentials associated with the site. If the user is currently authenticated to the site, the site will have no way to distinguish between a legitimate and a forged request.

Testing for cross-site request forgery can be conducted either manually or by using automated tools. 

In this article you will learn:

What impact can a CSRF attack have?

With no protection from this attack, cross-site request forgery can expose and compromise the confidentiality and integrity of the application’s userdata. 

In many cases, a CSRF attack violates how the website handles it’s sessions. This translates to attackers being able to hijack a user’s session in order to perform actions that the user did not intend to take. As an example, an adversary can trick a user into changing their account password to a password of the attacker’s choosing, or change the shipping address to an address the attacker controls without the user’s knowledge or permission resulting in the loss of the trust of end-users. 

How does a Cross-Site Request Forgery attack work?

There are numerous ways in which an end user can be tricked into loading information from or submitting information to a web application. In order to execute an attack, we must first understand how to generate a valid malicious request for the victim to execute.

Let’s consider the following example:

A user wants to transfer $50 to a friend. The bank application is vulnerable to CSRF. The attacker wants to trick our user into transferring the money to his account instead of the friend’s account. To do that, the attacker needs to:

  • Build an exploit URL or script
  • Trick the user into executing the action with social engineering

GET Scenario

If our bank application was designed to use GET requests to transfer parameters and execute actions, the money transfer operation might be reduced to a request like:

GET http://vulnerable-bank.com/transfer.do?acct=Nedim&amount=50 HTTP/1.1

The attacker first constructs the following exploit URL which will transfer $50,000 from the victim to the attacker’s account. The attacker manipulates the original command URL and replaces the beneficiary name and the transfer amount:

http://vulnerable-bank.com/transfer.do?acct=ATTACKERNAME&amount=50000 HTTP/1.1

Via social engineering, by sending the victim an email with HTML content or perhaps by including the exploit URL on another page for example, the attacker can get the unassuming victim to load their URL

A real life example of CSRF attack on an application using GET was a uTorrent exploit from 2008 that was used on a mass scale to download malware.

POST Scenario

Let’s assume that our bank uses POST for transferring parameters and executing actions. The vulnerable request would look like this:

POST http://vulnerable-bank.com/transfer.do HTTP/1.1
acct=Nedim&amount=50

Such a request can be delivered using a form tag:


This form relies on the user clicking the submit button, but it can also be executed automatically using JavaScript:


Other HTTP methods

APIs in modern web applications frequently use other HTTP methods, such as PUT or DELETE.

Now let’s assume that our vulnerable bank application uses PUT that takes a JSON block as an argument:

PUT http://vulnerable-bank.com/transfer.do HTTP/1.1

{ "acct":"Nedim", "amount":50 }

We can execute this request by using JavaScript embedded into an exploit page:


Thanks to the same-origin policy restrictions, this request will not be executed by modern browsers. This restriction is enabled by default unless the target website explicitly opens up cross-origin requests from the attacker’s origin by using CORS with the following header:

Access-Control-Allow-Origin: *

Manual testing for Cross-Site Request Forgery vulnerabilities

If you want to discover if the session is insecure you will need to examine the application's session. If session management is on the user side, indicating information is available to the browser, then the application is vulnerable. “Client-side values” refer to HTTP authentication credentials and cookies. 

Accessible resources via HTTP GET requests are undoubtedly vulnerable, although POST requests tend to be automated via JavaScript and are exposed and vulnerable, therefore the use of POST only is not enough to fix the occurrence of CSRF vulnerabilities.

Automated Tools for CSRF testing

1. Bright

Bright is a Dynamic Application Security Testing (DAST) scanner.  It can be integrated across the development pipelines to test your web applications and APIs, automating and simplifying the detection and remediation of CSRF and many other vulnerabilities

By shifting DAST scans left and integrating them across the CI/CD, developers and application security professionals are able to detect vulnerabilities as early as possible, to remediate them before they hit production. This allows developers to adopt the solution and use it throughout the software development lifecycle -  SDLC.

Bright's CSRF test first checks if there is any CSRF protection implemented, by checking if the target has "Access-Control-Allow-Origin'' header misconfiguration or missing "Origin" header. The second phase checks if the CSRF token itself is missing inside the request query. If all these steps are confirmed, the final step executes the requests, confirming and validating the vulnerability has been successfully exploited, to ensure there are no false positives.

2. OWASP ZAP

OWASP ZAP is an open-source web application security scanner, used predominantly by professional penetration testers. A great tool but not developer friendly.

ZAP detects anti-CSRF tokens solely by attribute names - that is considered to be anti CSRF tokens and is configured using the Anti CSRF in options. When ZAP detects these tokens it records the token value and which URL generated the token.

3. CSRF Tester

CSRF Tester is a project by OWASP, created by a group of developers for developers, to verify the integrity of HTTP requests in their web applications. CSRF Tester provides a PHP library and an Apache Module for cautious mitigation.

4. Pinata-csrf-tool

Intended to be used by advanced application security professionals. It generates the proof of concept CSRF HTML given an HTTP request to automatically discover whether it is a GET or a POST request with further validation for standard POST and Multipart/form POST. The tool creates HTML corresponding to the type of the request.

Conclusion

Many tools on the market can help you discover and remediate CSRF vulnerabilities but the question is how reliable and developer friendly they are.

With Bright you can easily test for CSRF, the OWASP Top 10 vulnerabilities and many more in just a few clicks. Bright is built from the ground up to put security testing into the hands of developers, integrated seamlessly into their environment and across the CI/CD.

Bright’s automatic validation of every exploitable vulnerability it detects removes false positives and the alert fatigue that comes with it. Developers get immediate results with developer friendly remediation guidelines to prioritise and fix the security vulnerabilities before they hit production. The security team also gets an accurate snapshot of their cyber posture without the need for manual validation, removing the largest bottleneck organisations face currently.
Want to see Bright in action? Get a free account here – https://app.brightsecurdev.wpenginepowered.com/signup

How to Prevent Cross-Site Scripting Attacks

What is Cross-Site Scripting Prevention?

Cross-site scripting prevention is the process of detecting and remediating XSS vulnerabilities in your websites or web applications before they hit production. The detection of XSS vulnerabilities can be done automatically, using an automated vulnerability scanner, or manually by performing penetration tests. In this article you will learn the best practices for cross-site scripting prevention and how you can implement them immediately. At the end of the article, you will also find a link to a free, developer-focused vulnerability scanner so you can start detecting and remediating cross-site scripting vulnerabilities early and often, as part of your development pipelines

In this article, you will learn:

How does cross-site scripting work?

Cross-Site Scripting (XSS) attacks are a form of injection attack, where malicious scripts are injected into trusted web applications. 

An attacker can use the web application to send malicious code, typically in the form of a browser side script, to a different end user, resulting in an XSS attack.

XSS vulnerabilities are very common, occurring where a web application uses input from a valid user contained within the generated output, but without the appropriate validation or encoding.

With the malicious script sent to the user, their browser is unable to categorically know that the script should not be trusted, and subsequently executes the script. This script can then access a multitude of data, including any cookies, session tokens, or indeed any other sensitive information that may be retained by the browser for that site. 

What are the types of XSS attacks?

There are three main types of XSS attacks:

  1. Reflected XSS: malicious script comes from the current HTTP request
  2. Stored XSS: malicious script comes from the website’s database
  3. DOM-based XSS:  where the vulnerability exists in client-side code rather than server-side code.

How important is Cross-site scripting prevention?

The damage from exploiting an XSS vulnerability depends on the sensitivity of the data your site handles. Here are some examples where hackers exploited  XSS vulnerable apps:

  • Spreading worms on social media: Facebook, Twitter and YouTube have all been successfully attacked in this way.
  • Session hijacking: Malicious JavaScript may be able to send the session ID to a remote site under the hacker’s control, allowing the hacker to impersonate that user by hijacking a session in progress.
  • Identity theft: If the user enters confidential information such as credit card numbers into a compromised website, these details can be stolen using malicious JavaScript.
  • Denial of service attacks and website vandalism.
  • Theft of sensitive data, like passwords.
  • Financial fraud on banking sites.

Cross-site scripting protection

Escape dynamic content

Usually, when a web page is rendered, dynamic content is woven into HTML. If the dynamic content is improperly treated, an attacker can use that to construct a stored XSS attack. The attacker would abuse an editable field by inserting some malicious JavaScript code, which is evaluated in the browser when another user visits that page.

You may not want your users to author raw HTML unless your site is a content-management system. Escape all dynamic content coming from a data store, so the browser knows it is to be treated as the contents of HTML tags, as opposed to raw HTML.

Escaping dynamic content generally consists of replacing significant characters with the HTML entity encoding:

” &#34
# &#35
& &#38
‘ &#39
( &#40
) &#41
/ &#47
; &#59
< &#60
> &#62

As you will see in the code samples below, most modern frameworks will escape dynamic content by default.

By escaping editable content in this way, the content will never be treated as executable code by the browser. This will prevent most XSS attacks.

Whitelist values

If a dynamic data item can only take a handful of valid values, restrict the values in the data store. Also, make sure your rendering logic only permits known, proper values.

An example where you may want to use this approach is by asking a user to select their country from a dropdown list,, instead of having them typing it in manually.

Implement a content-security policy

Modern browsers support Content-Security Policies. Content-Security Policies allow the author of a web-page to control where JavaScript and other resources can be loaded and executed from.

In order for an XSS attack to be possible, the attacker has to be able to run malicious scripts on a user’s web page – either by injecting inline

Setting a content security policy in the response header will allow you to tell the browser to never execute inline JavaScript, and to choose the domains that can host JavaScript for a page:

Content-Security-Policy: script-src ‘self’ https://apis.google.com

By whitelisting the URLs from which scripts can be loaded, you are implicitly stating that inline JavaScript is not allowed.

You can also place the content security policy in a tag in the element of a page:

This approach is very effective in protecting your users, but requires discipline to make your site ready for such a header. While having inline scripts is considered a bad practice in modern web-development, they are common in older, legacy sites.

To migrate away from inline scripts incrementally, consider making use of CSP Violation Reports. By adding a report-uri directive in your policy header, the browser will notify you of any policy violations, rather than preventing inline JavaScript from executing:

Content-Security-Policy-Report-Only: script-src ‘self’; report-uri http://example.com/csr-reports

This will give you reassurance that there are no lingering inline scripts, before you ban them outright.

Sanitize HTML

For some sites, there is a legitimate need to store and render raw HTML. If your site stores and renders rich content, you need to use a HTML sanitization library to ensure malicious users cannot inject scripts in their HTML submissions.

HTTP-only Cookies

Malicious JavaScript can be used to steal a cookie containing the user’s session ID. There is rarely a good reason to read or manipulate cookies in client-side JavaScript, so consider marking cookies as HTTP-only, meaning that cookies will be received, stored, and sent by the browser, but cannot be modified or read by JavaScript.

XSS Prevention with code examples

Cross-site scripting prevention in Python (Django)

Templates in Django escape HTML by default, so anything that looks like the following is generally safe:

**{{ contents }}**

You can override escape by using the | safe filter. There are often good reasons to do this, but you will need to conduct code reviews on anything that uses this command:

**{{ contents | safe }}**

Note that HTML-escaping can also be turned on or off with the {% autoescape %} tag.

Cross-site scripting prevention in Ruby (Rails)

Rails templates escape HTML by default, so anything that looks like the following is generally safe:

<%= contents %>

You can override escape by using the raw function, or using the <%== operator. There are often good reasons to do this, but you will need to conduct code reviews on anything that uses these functions:

<% raw contents %>

<%== contents %>

Cross-site scripting prevention in Java (Java Server Pages)

Use the c:out tag to safely escape HTML:

The following ways of writing to a template do not escape HTML, so you should use them with care:

<%= contents %>

${contents}

<%
out.println(contents);
%>

Cross-site scripting prevention in C# (ASP.NET)

Use either of the following functions to safely escape HTML (the <%: form was introduced in ASP.NET 4.0):

<%= HttpUtility.HtmlEncode(contents) %>

<%: contents %>

The following way of writing to a template does not escape HTML automatically, so you should use them with care:

<%= contents %>

Use HttpUtility.HtmlEncode(...) if you need to manually escape HTML.

Cross-site scripting prevention in Node

Mustache.js

In Mustache.js, any tags in double mustaches automatically escape HTML:

{{ contents }}

Keep in mind that tags in triple mustaches do not escape HTML, so use them with care:

{{{ contents }}}

Dust.js

Key tags automatically escape HTML:

{ contents }

However, escaping can be disabled with the |s operator, so use this with care

{ contents | s }

Nunjucks

If auto-escaping is turned on in the environment, Nunjucks will automatically escape tags for safe output:

{{ contents }}

Content marked with the safe filter will not be escaped - use this function with care:

{{ contents | safe }}

Auto-escaping can be disabled for a template, in which case tags need to be escaped manually:

{{ contents | escape }}

Cross-site scripting prevention in PHP

The echo command in PHP does not escape HTML by default, which means that any code like the following which pulls data directly out of the HTTP request, is vulnerable to XSS attacks:

Echo $_POST[“comment”];
?>

Cross-site scripting prevention in AngularJS

Any content written out in curly brackets will automatically be escaped, so the following is safe:

{{dynamicContent}}

Keep in mind that any code that binds dynamic content to the innerHTML attribute  will not be automatically escaped:


Cross-site scripting prevention in React

Any dynamic content written out in curly brackets will automatically be escaped in React, so the following code is safe:

render() {
return

{dynamicContent}

}

You can also write out raw HTML by binding content to the dangerouslySetInnerHTML property. The name is not a coincidence, so look out for any code that looks like the following:

render() {
return


}

How can automated tools help prevent cross-site scripting?

As mentioned above, preventing cross-site scripting attacks can be easy, with many frameworks escaping dynamic content by default. But that convenience can lead to inadvertence and some serious security weaknesses to your application and  your business.

Always make sure you scan your applications for vulnerabilities before releasing them to production, ideally as part of your DevOps and CI/CD pipelines to detect and remediate security vulnerabilities early,  on every build / commit. 

You can start automating your security testing today with Bright’s Dynamic Application Security Testing scanner, Bright. Built for developers and with no false positives, you can integrate it into your pipelines to shift security testing left and be secure by design. 
Sign up for your FREE account here: https://app.brightsecurdev.wpenginepowered.com/signup

Web Application Penetration Testing: A Practical Guide

What is Web Application Penetration Testing?

Web application penetration testing, also known as pentesting, simulates attacks against your web applications, to help you identify security flaws and weaknesses so they can be remediated. You can use penetration tests to detect vulnerabilities across web application components and APIs including the backend network, the database, and the source code. 

A web application penetration testing process provides a detailed report with security insights. You can use this information to prioritize threats and vulnerabilities and define a remediation strategy. 

In this article, you will learn:

Web Application Security Threats

Penetration testing is especially important for web applications as many web applications are mission critical systems. Web applications often store sensitive data, and may directly or indirectly generate revenue. A web application breach can cause direct financial damages, negatively impact the reputation of the business, may cause the organization to violate its compliance obligations and cause significant reputation damage. 

Since web applications handle valuable data, these systems are increasingly targeted by attackers. Here are key takeaways from the ENISA Threat Landscape 2020 and PT Security Web Application Threats Report: 

  • Web application attacks increased by 52% year-over-year in 2019.
  • The average web application has 22 security vulnerabilities.
  • One out of five vulnerabilities discovered on web applications is of high severity.
  • 20% of the organizations reported that their applications services were hit daily by distributed denial of services (DDoS) attacks.
  • The most common attack techniques are buffer overflow (24%), resource reduction (23%), HTTP flood (23%), Low Slow (21%), and HTTPS flood (21%).
  • Security misconfigurations are the cause of 84% of all observed vulnerabilities in web applications.
  • 53% of web applications suffer from cross site scripting (XSS) vulnerabilities, and 45% have broken authentication.
  • 39% of sites are vulnerable to unauthorized access, and 16% of web applications provide full system access to attackers.

Types of Penetration Testing for Web Applications

When you run a pentest for web applications, there are several aspects you need to consider. These aspects determine the location and the type of attack.

Here are the main differences between external and internal pentesting:

  • External pen testing—attacks the application from the outside. The test simulates how an external attacker would behave when launching an attack. You can perform an external pentest to check firewalls and servers. 
  • Internal penetration testing—attacks launched from within the organization. This is typically performed through LAN connections. The goal is to identify vulnerabilities that might exist within the firewall, simulating an attack by a malicious insider.

In addition to location of the attacker, there are other aspects to consider, such as levels of access and scope of knowledge. Below are three main types of pentesting you can run:  

  • Black box penetration testing—simulate attacks launched by external actors, with no prior knowledge of the targeted system. 
  • Gray box penetration testing—simulates attacks launched by internal actors, with user-level access to certain systems.
  • White box penetration testing—a comprehensive pentest that simulates attacks launched by someone with root-level or administrator access and knowledge. 

Related content: read our guide to penetration testing services

How Do You Test Web Application Security? Here’s a Web Application Pentesting Checklist

Web application pentesting is typically implemented in three phases: planning, exploitation, and post-execution. Below is a quick checklist for your reference. 

Here are important aspects to consider during the planning phase:

  1. Define the scope of the test.
  2. Provide the pentester with all needed information, including relevant documentation.
  3. Determine a success criteria for your test.
  4. Review any available results from previous tests, if applicable.
  5. Assess and learn as much as possible about the tested environment.

Here are important aspects to consider during the exploit phase:

  1. Run the test using several different roles.
  2. Follow the pre-defined successes criteria and reporting procedure when discovering vulnerabilities.
  3. Create a clear and detailed report, explaining the measures taken, vulnerabilities detected, and the severity of each vulnerability.

Here are important aspects to consider during the post-execution phase:

  1. Provide recommendations for remediating the detected vulnerabilities.
  2. Re-test to check that the discovered vulnerabilities were properly remediated.
  3. Once all tests are concluded, revert all changes back to the original configuration, including proxy settings.

Web Application Security FAQ

What Tools Are Used for Web Application Penetration Testing?

There are many tools you can use for pentesting, some offer ad-hoc capabilities while others provide an end-to-end solution. Bright is an end-to-end platform that helps pen-testers automate the penetration testing process for web applications. Nmap is a tool you can use for security audits as well as network discovery. Wireshark is a popular tool that analyzes network protocols, and Metasploit is a framework you can use to create custom pentesting tools. 

Learn more in our detailed guide to penetration testing tools

What is a Web Application Security Assessment?

A web application security assessment can help you identify vulnerabilities. You can leverage this assessment to identify misconfiguration flaws, weak authentication processes, sensitive information leakages, insufficient error handling issues, and more. 

The goal of conducting web application security assessments is to discover as many vulnerabilities in advance as possible and remediate quickly. You can use this information to reduce the attack surface and achieve regulatory compliance.

Web Application Penetration Testing with Bright

Bright significantly improves the application security pen-testing progress. By providing a no-false positive, AI powered DAST solution, purpose built for modern development environments the pen-testing process can be automated and vulnerabilities can be found faster and at a lower cost. Moreover, integrating Bright into DevOps environments enables you to run DAST scans as part of your CI/CD flows to identify a broad set of known (7,000+ payloads) security vulnerabilities early in the development process. 

In addition to detecting technical vulnerabilities, Bright’s unique ability to detect business logic vulnerabilities offers broader coverage and detection that any other automated solution. 

Learn more about Bright

Your Website got Hacked? Here is what you should do!

Has your website been hacked? Don’t panic! We prepared a simple list of steps for you to follow to recover it.

Even if your website hasn’t already been hacked, bookmark this article! Unfortunately, as with all the exploits and tools available to hackers and software technologies are evolving so rapidly, there is a realistic chance you will need it at some point.

There is even a greater probability you will experience a breach if you are using an open-source CMS with many plugins such as WordPress or Joomla!

Here are the steps you need to take in case your website is hacked:

1. Create an action plan
2. Create a battle sheet
3. Take your system offline
4. Clone your system to a testbed or staging server
5. Scan your website for vulnerabilities
6. Fix the vulnerabilities
7. Bring the fixed version back online
8. Monitor your new and improved website

9. Create a reaction plan for future events

Creating an action plan

Before doing anything, take a few minutes to think through how you can minimize the negative impact and maybe even gain something from the incident.

Write down all the steps you need to take to:

– Preserve the current state. This will help you understand how the breach happened.
– Don’t alert the attacker with any rapid changes. You don’t want the attacker to cover their tracks or cause more damage.
– Collect information and tools necessary to administer the website and related components

Create a battle sheet

Before you take the next step, it’s important you have the following on hand:

– Access details and credentials for your website
– Filenames and paths for any configuration files
– Access details and credentials for the OS or platform underlying your website
– If you are managing the underlying hardware, access details and credentials for the “lights-out” access tools (DRAC, ILO, KVM, local or remote console, etc)
– Telephone numbers, email addresses, and support portal information for any vendor providing you with the web server and any of the underlying layers

Take your system offline

Take your system offline. Taking your system offline will limit any additional damage the attacker may do to your website. This will also prevent attackers from covering their tracks or evidence which may lead you back to them or the methods they used. Taking your system offline will also prevent them from inflicting additional damage on other people.

The specific steps you need to take in order to take your system offline depend on where you are hosting the website. Are you using a hosting company or is the system located at your company premises?

Clone your system to a testbed or staging server

Some of the tests you are going to run as part of your investigation tasks can be quite aggressive. They can damage your website, or in this case to any artifacts left on the system by the attacker.

As those artifacts can lead back to the attacker or the methodology the attacker used to breach your website, it’s important you preserve them.

Clone your system to a separate testbed or staging server. Just make sure you don’t use a hosting provider. The testbed has to be completely isolated from any public IP address spaces. This will insure your system can’t be reached from the outside, but also that your cloned system cannot access or affect third parties.

Scan your Website for vulnerabilities

Now that you populated your testbed, it’s time to test your system.

Scan your entire website for all possible points of entry and simultaneously look for this breach’s specific point of entry.

You can test your entire website for all possible entry points by using automation.

Using a reputable web vulnerability scanner, launch a scan on your cloned testbed. This will help you:

– Identify any misconfiguration of the web server and related software
– Identify old and known vulnerable software versions
– Identify insecure security access methods
– Identify inappropriate access to filesystem locations
– Run a very large battery of specific tests looking for specific known vulnerabilities

If you just restore the website from a backup, it is only reasonable to assume that the attacker can rapidly gain access using the same entry point. For this reason, it’s crucial you find the point of entry for the breach and fix the issue.

To do so, jump to the affected system and:

– Get a list of running processes and look for suspicious running applications or services such as backdoors or trojans
– If your system has been hacked, there is a high possibility that the attacker may have introduced new files with malicious code or changed existing files on your system
– Look at the log files generated by the operating system, the web server software, and any other software also used by your website

When the scan finishes, compare your findings with the list of vulnerabilities the automated web vulnerability scanner found.

Fix the vulnerabilities

Using the information gained from your manual investigation along with the list of vulnerabilities compiled by the web scanner, implement code improvements, server updates and hardening to prevent such an event from repeating and plug other weaknesses.

Summarised:

– Stop any foreign processes
– Remove any extraneous files or executables
– Replace changed files and data sets with fresh or sanitized versions

Check any fixes implemented by repeating the automated scan.

Bring the fixed version of the site back online

Now that your clean up is complete, suspected files and processes have been stopped and eliminated, the points of entry secured, and other security measures are in place, you can bring your website back online.

Monitor your new and improved website

Huray, your website is up and running! But you need to make sure that your fixes are effective. Come up with an early-warning system of an attacker trying to get into your system via the same access vector as the event you have just fixed.

A DAST tool integrated into your development process can help you identify vulnerabilities early and help you remediate them before they go into production. This can help you prevent future security incidents.

If the attacker manages to get back in, you either haven’t identified the entry point correctly, or you have not identified all of them. Repeat the process to again recover from this latest hack. 

Make an action plan for future incidents

After you have completely recovered from this incident and completed all the tasks related it, you should revisit this section, review the action plan you made and use it to build a recovery procedure for any future incidents.

This will allow you and other members of your support team to more effectively and efficiently handle any future incidents.

Discover and Remediate OWASP Top 10 Vulnerabilities using AIAST®

The information age has advanced the way in which our society generates, stores and exchanges information. Hyperconnectivity, availability and business networking are great benefits of this era. However, we are facing significant new challenges in the realm of cybersecurity and information security, dictating the need for new solutions and a fresh approach to keep up with ever-evolving threats.

Information security is one of the most important fields in the information technology sector with data and application security taking front and center as the most important areas of focus.

As the pioneer in AIAST® (Artificial Intelligence Application Security Testing) solutions, Bright combines the best of all the approaches currently used in the realm of application security. We provide innovative solutions that have never been seen before. Bright delivers various AIAST® tools powered by genetic algorithms and reinforcement learning engine.

Bright’s solutions take an active approach to application security testing and are powered by an adaptive engine that enables the discovery of different sets of issues and vulnerabilities, including business logic issues which until now were considered impossible to detect by an automated solution.

Bright’s AIAST® is a SaaS solution that combines Application Security Testing with AI. The technology is powered by a proprietary deep learning algorithm that creates its own sophisticated malicious scenarios covering both known vulnerabilities and new, previously discovered vulnerabilities.

The OWASP Top 10 list details the 10 most prevalent and high priority risks that most applications face and includes:

  • Injection
  • Broken Authentication
  • Sensitive Data Exposure
  • XML External Entities (XXE)
  • Broken Access Control
  • Security Misconfigurations
  • Cross-site Scripting (XSS)
  • Insecure Deserialization
  • Using Components with known vulnerabilities
  • Insufficient logging and monitoring


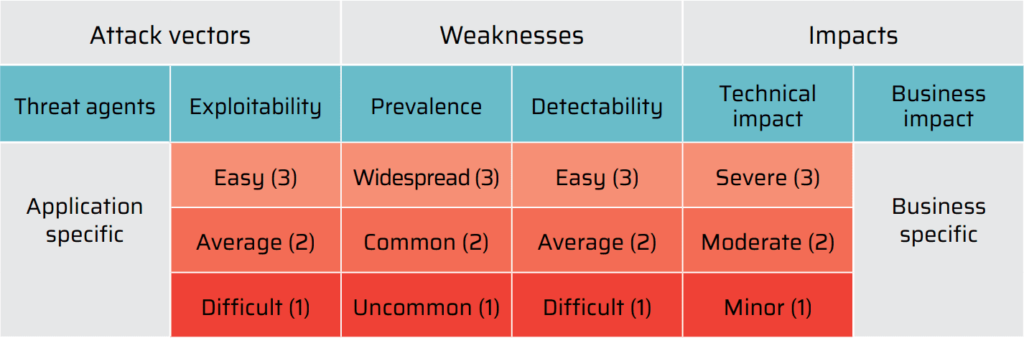
The OWASP Risk Rating Methodology describes the likelihood and the impact of security risks outlined in the OWASP Top 10 list. As for the threat model, a threat agent uses an attack vector to exploit a security weakness that is exposed to an asset or a function due to the lack of security controls. 

The OWASP Risk Rating Methodology describes the likelihood and the impact of security risks outlined in the OWASP Top 10 list. As for the threat model, a threat agent uses an attack vector to exploit a security weakness that is exposed to an asset or a function due to the lack of security controls. 

The risk level is calculated based on a table that determines the level of impact that a threat agent can introduce with each of the Top 10 vulnerabilities. The table provides a rating on a scale of 1 to 3 for each of the risk factors. Threat agents and business impacts are described as they are specific to every application and its business objectives. Below is a table outlining the risk levels: