Security is Everybody’s Job — Part 3 — What IS DevOps?

What IS DevOps?

There are many definitions of DevOps, too many, some might say. Some people say it’s “People, Processes, and Products”, and that sounds great, but I don’t know what I’m supposed to do with that. When I did waterfall I also had people, processes, and products, and that was not great. I thought DevOps was supposed to be a huge improvement?

I’ve heard other people say that it’s paying one person to do two jobs (Dev and Ops), which can’t be right… Can it? I’ve also been told once by a CEO that their product was “made out of DevOps”, as though it was a substance. I decided not to work there, but that’s another story. Let’s look at some better sources.

Wikipedia says:

DevOps is a set of practices that combines software development and information-technology operations which aims to shorten the systems development life cycle and provide continuous delivery with high software quality.

But what are the practices? Why are we aiming to shorten the SDLC? Are we making smaller software? What is ‘continuous delivery’?

To get to the bottom of it I decided to read The DevOps Handbook. 
Then I knew what DevOps was, and I knew how to do it. As an added bonus, I 
discovered that I LOVED DevOps.

According to the DevOps Handbook, DevOps has three goals.

Improved deployment frequency; Shortened lead time between fixes;

Awesome! This means if a security bug is found it can be fixed extremely quickly. I like this.

Lower failure rate of new releases and faster recovery time;

Meaning better availability, which is a key security concern with any application (CIA). Lower failures mean things are available more often (the ‘A’ in CIA), and that’s definitely in the security wheelhouse. So far, so good.

Faster time to market; meaning the business gets what they want.

Sometimes we forget that the entire purpose of every security team is to enable the business to get the job done securely. And if we are doing DevSecOps, getting them products that are more secure, faster, is a win for everyone. Again, a big checkmark for security.

Great! Now I think the DevOps people want the same things that I, as a security person, want. Excellent! Now: How do I *DO* DevOps?

That is where The Three Ways of DevOps comes in.

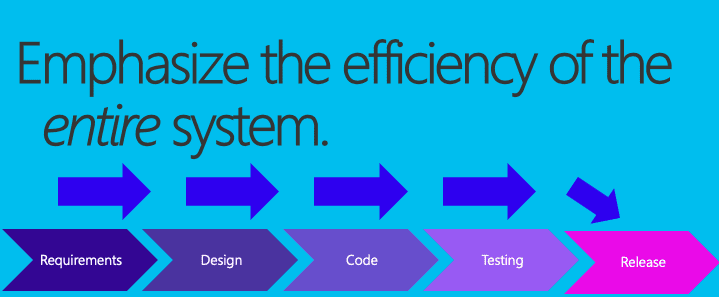
  1. Emphasize the efficiency of the entire system, not just one part.
  2. Fast feedback loops.
  3. Continuous learning, risk-taking and experimentation (failing fast)

In the next post we will talk more in detail about The 3 Ways (and how security fits in perfectly).

Security is Everybody’s Job — Part 2 — What is Application Security?

Application Security is every action you take towards ensuring the software that you (or someone else) create is secure.

Tanya Janca

This can mean a formal secure code review, hiring someone to come in and perform a penetration test, or updating your framework because you heard it has a serious security flaw. It doesn’t need to be extremely formal, it just needs to have the goal of ensuring your systems are more secure.

Now that we know AppSec is, why is it important?

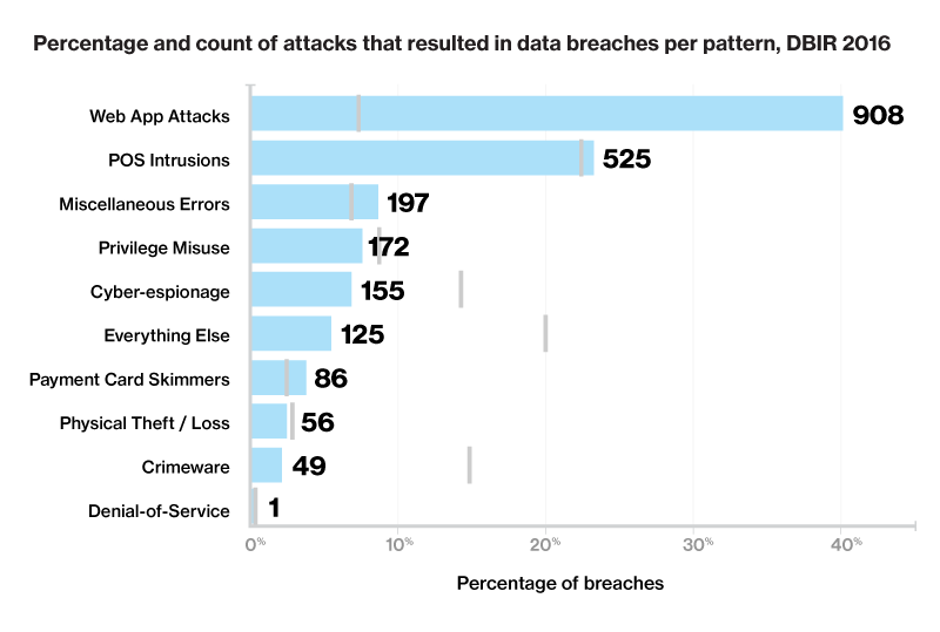
For starters, insecure software is (unfortunately), the #1 cause of data breaches (according to the Verizon Breach Reports, 2016, 2017, 2018 and 2019). This is not a list that anyone wants to be #1 on. According to the reports, insecure software causes 30–40% of breaches, year after year, yet 30–40% of the security budget at most organizations is certainly not being spent on AppSec. This is one part of the problem.

The graph above is from the Verizon Breach Report 2017. Hats off to Verizon for creating and freely sharing such a helpful report, year after year.

If the problem is that insecure software causes breaches, and one of the causes is that security budgets don’t appear to prioritize software, what are some of the other root causes of this issue?

For starters, universities, colleges, and programming bootcamps are not teaching the students how to ensure that they are creating secure software. Imagine electricians whet to trade school, but they didn’t teach them safety? They twist two cables together and then just push them into the wall, unaware that they need two more layers of safety (electrical tape, and then a marrett). This is what we are doing with our software developers, we teach them from their very first lesson how to make insecure code.

Hello (insecure) World

Lesson #1 for every bootcamp or programming course: Hello World.
Step 1) Output “Hello World” to screen
Step 2) Output “What is your name?” to screen

Step 3) Read the user’s input into a variable (note: we skip teaching input validation)
Step 4) Output the user’s input to the screen with a hello message (note: we skip output encoding)

The above lesson teaches new programmers the best possible recipe for including reflected Cross Site Scripting (XSS) in their application. As far as I know there is not a follow up lesson provided on how ensure the code is secure.

“Hello World” is the most-taught lesson for starting a new programming language, I’m sure you’ve seen it everywhere. More like “Hello Insecure World”.

Although there has been some headway in universities and colleges recently, most of them barely scratch the surface in regards to application security.

So that’s reason #2. Let’s move onto reason #3.

Another issue that contributes to this problem is that security training for developers is costly. While this is true for all types of professional training, security training is significantly more expensive then other forms of technical training. A single course at the SANS institute (a well-respected training establishment that specializes in all things cyber), could cost an attendee as much as $5000-$7000 USD, for one week of training. There are other less-pricy options, such as taking a course when attending a conference, which usually range from $2000-$5000, however, those are of varying quality, and there is no standardized curriculum, making them a bit of a gamble. I’ve taken several trainings when attending various conferences over the years, and I’d say about 1/2 were good.

There are much cheaper alternatives to the options above (such as the courses from We Hack Purple and other training providers), and they are of very varying quality levels. I’ve seen both good free courses and some where I wish I could have my time back they were so bad. Most of them do not provide a curriculum to follow either, meaning it is often unclear to the student which other courses they should take in order to get the specific job they want. It is very easy to waste quite a bit of time and money; I know, that is how I started my AppSec career… Although I was quite lucky to have two professional mentors guiding me, which made it a lot easier. Not everyone has a mentor.

Another cause (#4) of insecure software is that the security team is usually grossly outnumbered. According to several sources there is usually 100 software developers for every 10 operations employees for every single (1) security professional.

Let me repeat that. There are 100/10/1, Dev/Ops/Sec. With numbers like that you can’t work harder, you have to work smarter. Which is where we are going with this series.

Now we know the problem and several of the causes, what can we do about it? The short answer is DevSecOps, and the long answer is ‘read the rest of the blog series’.

For now though, let’s define DevSecOps, before we dive into what DevOps is, The Three Ways, and so much more, in the next article.

DevSecOps: performing AppSec, adjusted for a DevOps Environment. The same goals, but with different tactics and strategies to get us there. Changing the way we do things, so that we weave ourselves into the DevOps culture and processes.

Looking for more content? Part 3 is out and you can check it out here.

Security is Everybody’s Job — Part 1 — DevSecOps

This is the first in a many-part blog series on the topic of DevSecOps. Throughout the series we will discuss weaving security through DevOps in effective and efficient ways. We will also discuss the ideas that security is everybody’s job, it is everyone’s duty to perform their jobs in the most secure way they know how, and that it is the security team’s responsibility to enable everyone else in their organization to get their jobs done, securely. We will define DevOps, ‘The Three Ways’, AppSec and DevSecOps. We will get in deep on the many strategies we can adjust security activities for DevOps environments, while still reaching our goals of ensuring that we reliably create and release secure software.

In summary; We will discuss how to make security a part of our daily work. 
It cannot be added later or after, it needs to be a part of everything.

But let’s not get ahead of ourselves, I have many more posts planned where I will attempt to sway your opinion my way.

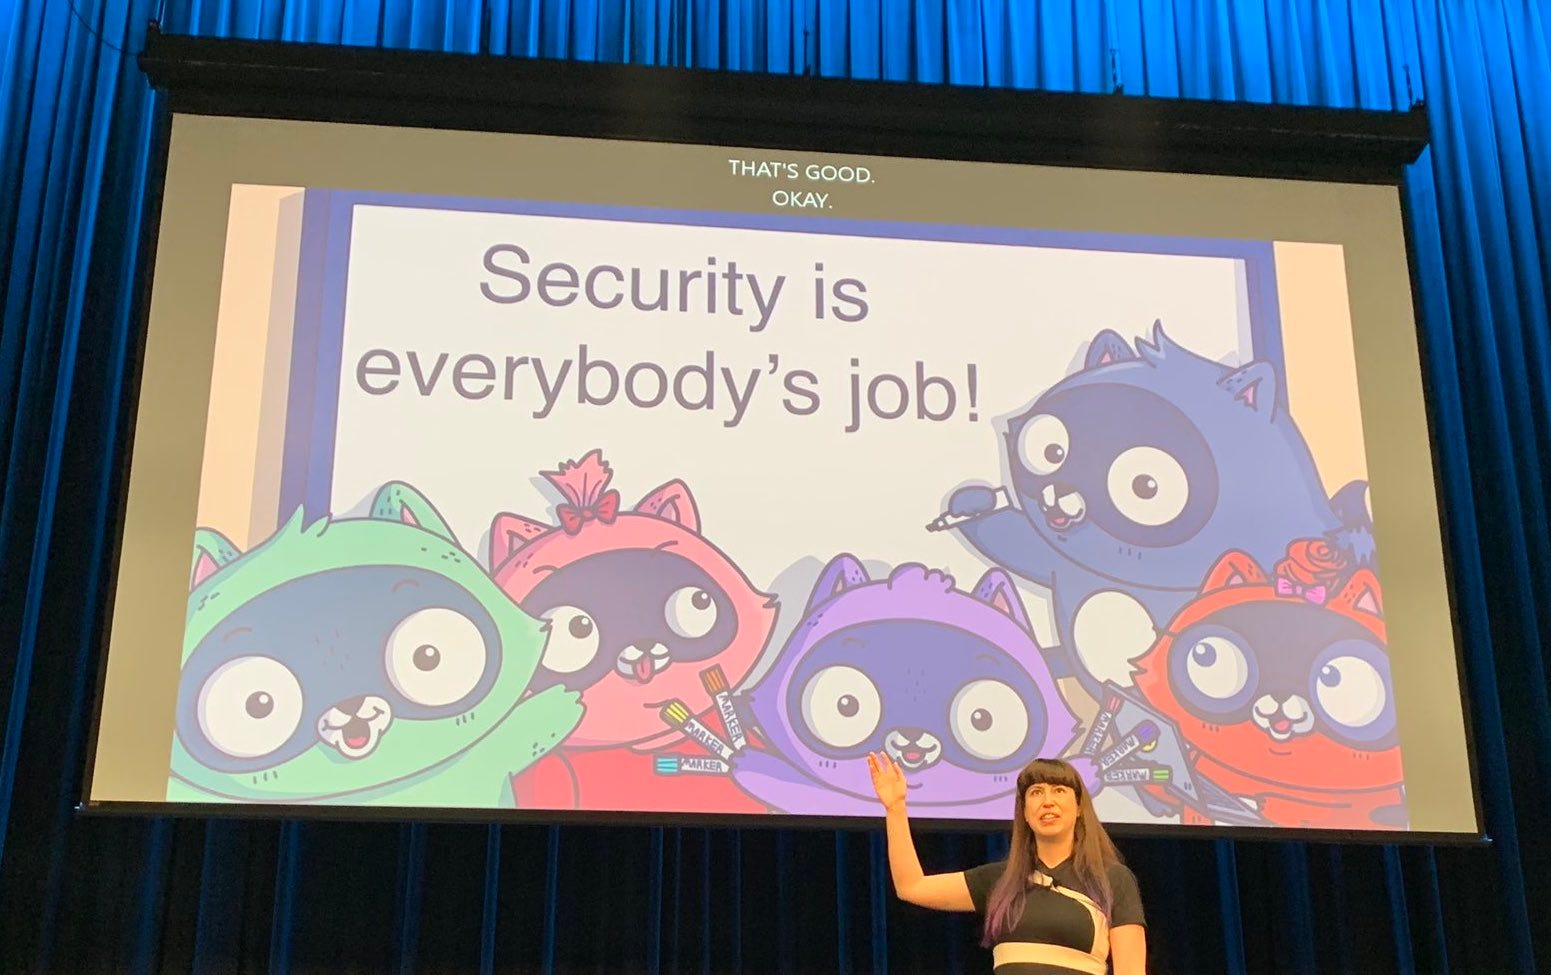
Tanya Janca, also known as SheHacksPurple, presenting her ideas in Sydney Australia, 2019. Artwork by the talented Ashley Willis.

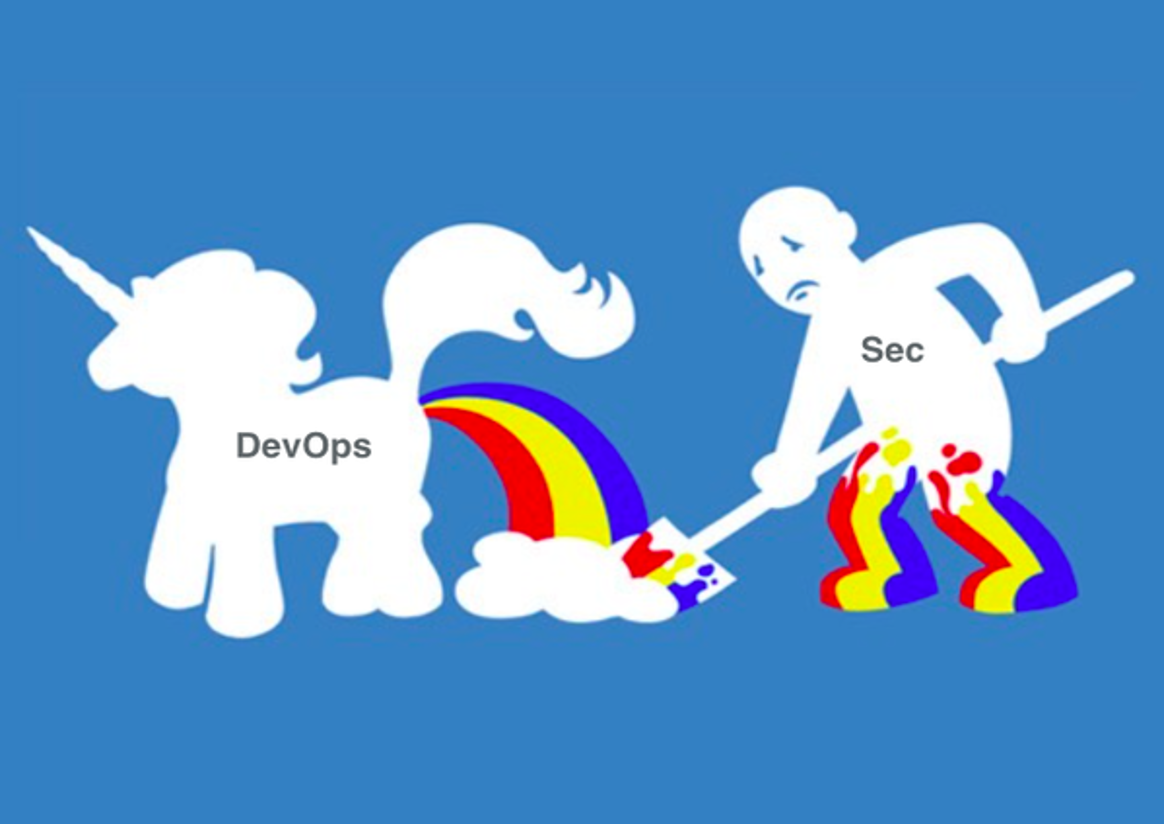
Before we get too deep into anything I’d like to dispel some myths. Look at the image below. This is how *some* security professionals see DevOps.

Slide credit: Pete Cheslock

This slide’s author, Pete Cheslock, is highly intelligent and experienced, this mention is not meant to insult him in any way. The slide is social commentary, it is not literal. That said, many people I’ve met truly feel this way; that DevOps engineers are running around making security messes where ever go, and that we (security professionals) are left to clean up the mess. I disagree with that opinion.

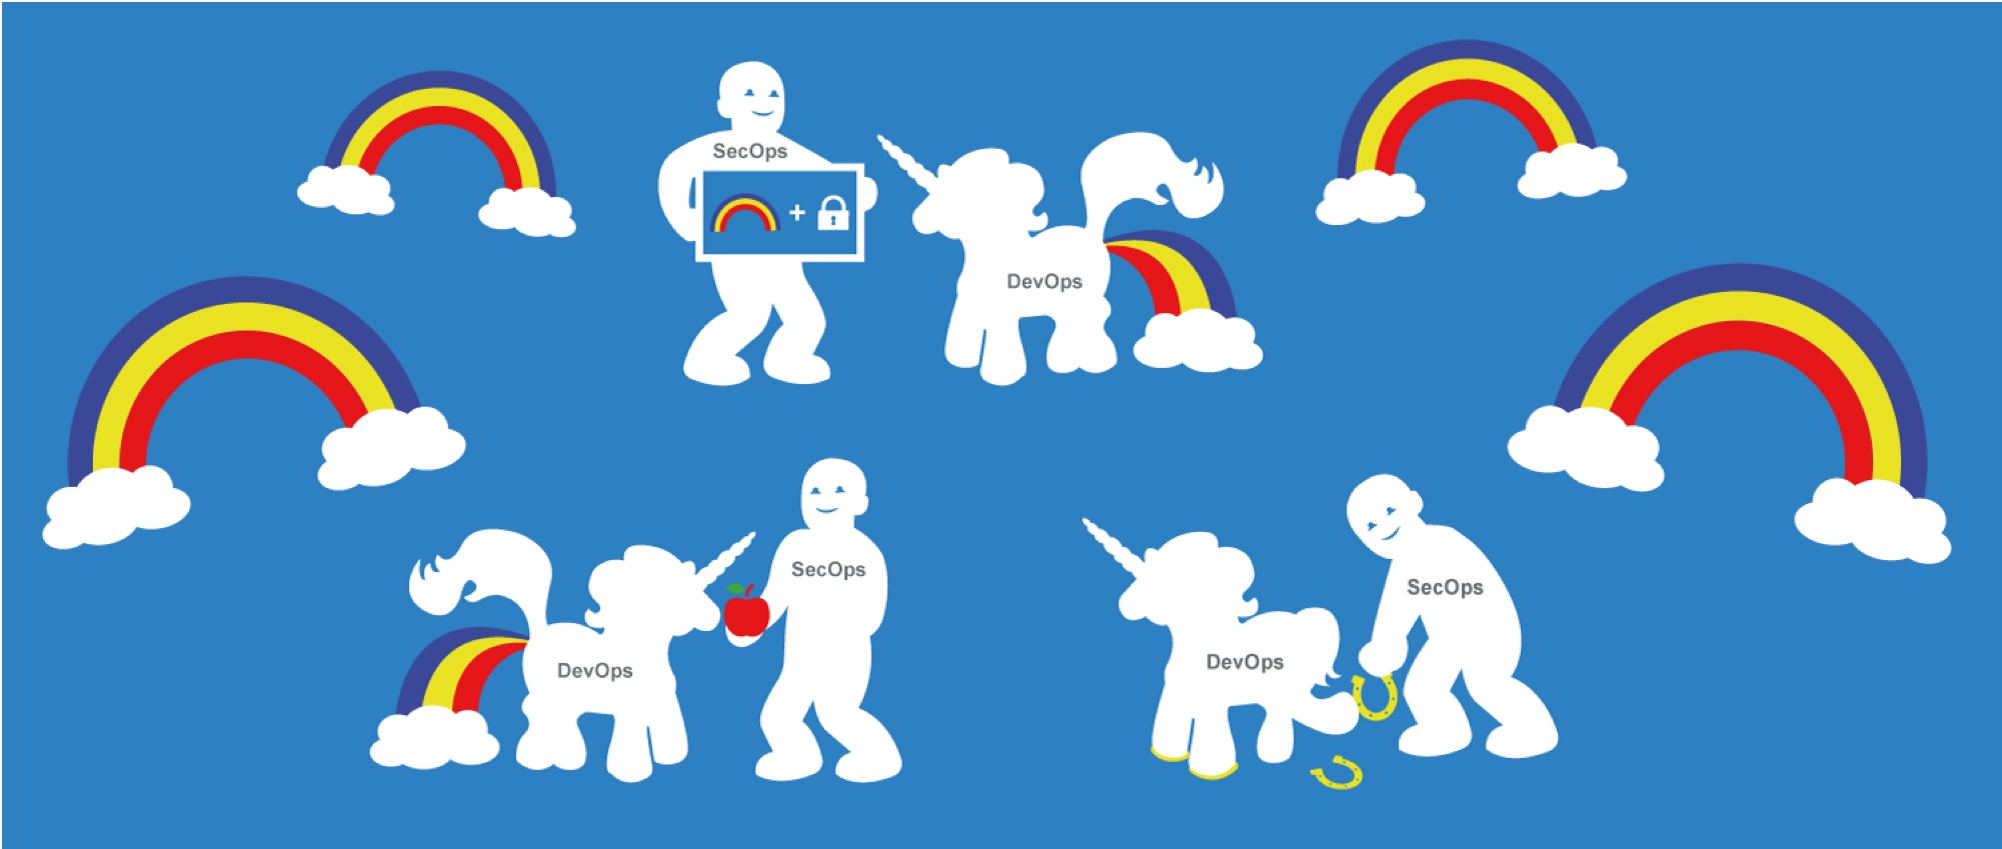
Luckily for me, my introduction to DevOps was at DevSecCon, where they introduced me to this image. Below you can see the security team teaching, providing tooling and enabling the magical DevOps unicorns in doing their jobs, securely. This is how I view DevOps; the security team enabling everyone, working within the confines of the processes and systems that all the other teams use.

Slide Credit: Francois Raynaud & DevSecCon

This series will be loosely based off a conference talk which I have delivered at countless events, all over the planet, ‘Security is Everybody’s Job’. You can watch the video here.

Part 2 of this article is available here.

Threat Modelling Serverless

I met with my colleague Bryan Hughes the other day to discuss the security of a serverless app he’s creating for JSConf EU (there will be no spoilers about his creation, don’t worry). We had discussed the idea of threat modelling while on a business trip together and he wanted to give it a go. Since I am particularly curious about serverless apps lately thanks to Tal Melamed having dragged me into the OWASP Serverless Top 10 Project, I was excited to have a chance to dive down this rabbit hole.

Bryan’s app’s architecture:

  • Azure Functions App (MSFT serverless)
  • JWT tokens for Auth, they will be short-lived
  • His app will allow other Azure users to call it, with parameters, and it will do something exciting (see? no spoilers!)

Once Bryan has explained what his app would do, he told me his security concerns: who would have access to his app? Could they break into other areas of his Azure Subscription? Exactly what type of authentication token should he use? How would he handle session management? All of which are definitely valid concerns, I was impressed!

We discussed each one of his concerns, and possible technical solutions to mitigate each risk. For instance, use JWTs only to send a random session token value, never a password or sensitive data, and never a number that actually corresponds to something important, such as using someone’s SIN number as their session ID number, that is sensitive info, and an insecure direct object reference. I reminded him that JWTs are encoded, not encrypted, and therefore they were not a secure way to transmit data. Also, I suggested that he create a virtual network around this app (firewalls), just in case someone gets into it, it would mean that they can’t get into the rest of his network and subscription.

Note: RFC 7516 allows for the encryption of JWT tokens, follow the link for more info.

Then we talked about my concerns, which started with a bunch of questions for Bryan about his users and his data.

  • What data are you asking for from your users? Is any of it sensitive?

He’s asking for their GitHub info, so that he could give them access to call his serverless app so he could grant them access, but that is all. This one piece of data is sensitive info.

  • Who are your users? What are their motivations to use your app?

The users are conference attendees who want to learn how to call a serverless app like an API, and then make his app do the cool thing that it would do. It’s a learning opportunity, and it’s fun.

  • Let’s assume you have a malicious user, how could they attack your app?

My first concern was Denial of Service or Brute Force-Style attacks. To avoid these attack vectors he should follow Azure Functions best practices guide, specifically, he should set maxConcurrentRequests to a small number (to avoid a distributed denial-of service), add throttling (slowing down requests to a reasonable speed, which would stop scripted attacks) by enabling the “dynamicThrottlesEnabled” flag, and ideally also set a low number for the maxOutstandingRequests setting, to ensure no one overflows his buffer for requests, which would also result in a denial of service. (Note this is the “A” in CIA: availability)

Other attacks I was concerned about where someone sending malformed requests, in attempt to elicit unexpected behaviour from his app, such as crashing, deleting or modifying data, allowing the user to inject their own code or other potential issues. We discussed using a white list for user input validation and rejecting all requests that were not perfectly formed, or that contained any characters that were not “a-z,A-Z,0–9”. (Note this is an attack on both Integrity and Availability)

The last attack vector I will list here is that users may attempt to access the data itself, the subscription IDs of all the other users (Confidentiality). This was the most important of the risks in this list, as you are the guardian of this data, and if you lose it, and they were to be attacked successfully as a result, this could cause catastrophic reputation damage (to the conference, to him as the creator of the app, to Microsoft as his employer). When I explained this, it became his #1 priority to ensure his users and their data were protected during and after using his system.

  • How long are you keeping this data? Where are you storing it? How are you storing it?

Originally Bryan was hoping to avoid using a database together; no data collection means nothing to steal. Although he’s still looking into if that’s a possibility, the plan is to use a database, for now.

He decided he would keep the data until just after the conference was over, and then destroy it all (hence making the risk only a 48~ hour risk). It would be stored in a database (we discussed encryption at rest and in transit, as well as always using parameterized queries, and applying least privilege for the DB user that calls those queries (likely read-only or read/write, but never DBO).

  • What country is this conference in? Will you be subject to GDPR?

It would be in Europe, and therefore is subject to GDPR. I introduced him to Miriam Wiesner, an MSFT employee with a Pentesting and Security Assessment background, who happens to live in the EU and therefore would have familiarity. I said she would have better advice than I would.

The conversation was about an hour, but I think you get the picture.

The key to serverless is to remember that almost all the same web app vulnerabilities still apply, such as Injection or Denial of Service (DOS) attacks, and that just because there is no server involved, does not mean you do not need to be diligent about the security of your application.

If you want to keep up with Bryan Hughes, and see the results of his project, you can follow him on Dev.TO.

I hope that you found this informal threat model helpful.

How Vue Unit Testing Works and 4 Critical Best Practices

What is Vue.js Unit Testing?

When building a Vue.js application, unit testing is important to ensure the quality of your code and prevent regressions. Vue unit testing involves breaking your application into functions, modules, classes, and components, each of which can be tested independently. By writing unit tests for your components and running them with each build, you can catch issues early and fix them early in the development lifecycle.

To write a unit test in Vue.js, you create a file with the same name as the code you want to test, adding the extension spec.js. Within the unit test, you do the following:

  • Import a function from the original file.
  • Add a describe block to specify what is the desired functionality.
  • Add one or more test statements, each of which checks if the function returns the correct output given a certain input.

Vue Test Utils is an official helper library provided by Vue that lets you mount and render Vue.js components using the concept of wrappers. 

Related content: Read our guide to unit testing in JavaScript applications (coming soon)

In this article:

How Unit Testing Works in Vue.js

In Vue.js, a unit test usually covers a single function, class, composable, or module. The purpose of a unit test is to check correctness and business logic for a small part of the overall application. It is common to “mock out” other parts of the environment, such as the initial state, network requests, and third-party modules.

Let’s see how to test a simple function in Vue.js. These code examples were shared in the Vue documentation.

The following function increments an integer until a maximum number is reached. Let’s say this function is part of the file example.js.

export function increment (current, max = 10) {
  if (current < max) {
    return current + 1
  }
  return current
}

We’ll create a unit test for this function, which will assert that given different inputs, it returns the correct output. If an assertion fails, it will be clear that the problem is with this increment function.

The unit test will be in the file example.spec.js. It first imports the original function so we can invoke and test it:

import { increment } from './example'

This code block uses the describe function to state what is the desired functionality of the unit under test:

describe('increment', () => {
  test('increments the integer by 1', () => {
    expect(increment(0, 10)).toBe(1)
  })

The following test checks if the function really stops at the maximum number:

  test('does not increment the provided integer over the max', () => {
    expect(increment(10, 10)).toBe(10)
  })

The following test checks if the function has a default maximum number of 10:

  test('default max number is 10', () => {
    expect(increment(10)).toBe(10)
  })
})

Testing Vue-Specific Features: Composables and Components

Testing Vue Composables

A Vue Composable reuses stateful logic using the Vue Composition API. This allows you to manage functionality with constantly changing state, such as touch gestures or database connection states. This is in contrast to libraries that reuse stateless logic, such as the ability to format a date.

Testing Composables works differently depending on their use of a host component instance. Composables depend on a host component instance if they use lifecycle hooks or the provide / inject APIs. 

  • If a Composable depends on a host component – you need to wrap it in a host component in order to test it.
  • If a Composable only uses Reactivity APIs – you can test it directly by invoking it and asserting the state or return values of its methods.

If your Composable is more complex, it might be easier to write tests against its wrapper component, effectively treating the Composable as a component (see below).

Testing Vue Components

Components can be tested in two ways.

  • White-box testing—tests component implementation and dependencies. The goal is to isolate the component under test. These tests typically mock some or all of a component’s sub-components, and set up plugin states and dependencies.
  • Black box testing—tests a component without knowing the implementation details. These tests mock out dependencies as little as possible, to test the integration of the component with the entire system. Because these tests render all sub-components, they are not really unit tests but more like integration tests.

What is Vue Test Utils?

Vue Test Utils is an official helper library that enables testing of Vue.js components. It provides several ways to mount and manipulate Vue.js components in an isolated way using the concept of wrappers.

A wrapper is an abstraction of a mounted Vue component. It provides capabilities that are useful for testing, for example triggering a click or an event. You can use it to:

  • Simulate input—for example, user actions or store changes
  • Check if output is correct—for example, by rendering components, triggering Vue events, or calling functions.
  • Mock and stub components—components can be rendered with shallowMount or as stubs.

The wrapper abstraction is very powerful because it lets you access the Vue instance via wrapper.vm, meaning you can gain access to any additional Vue functionality you need for your testing. 

Related content: Read our guide to unit testing in angular.

4 Best Practices for Vue Unit Testing

Test Component Interfaces, Not Internals

When you are testing UI components, it is not a good idea to achieve full coverage of all code lines in your component. This will lead to an excessive focus on implementation details, leading to brittle tests that are likely to break every time you change your implementation.

A better approach is to write tests that evaluate the public interface of your component, treating the internal elements as a black box. A test should assert that an input, such as a user action or a change of properties, results in the expected outputs, which may be rendered in the browser or emitted as custom events.

This approach can save time and improve the reliability of tests, because as long as the public interface stays the same, tests will pass, even if the internal implementation of the component has changed.

Shallow Mounting

When you mount a component as part of a unit test, it can be slow and inefficient to mount the entire component with all its dependencies. Vue Test Utils provides a useful method called shallowMount, which lets you mount a component while automatically stubbing its child components, and without actually rendering them. 

Like mount, the shallowMount method provides a wrapper that contains the rendered Vue component, but ensures child components are stubbed out. It looks like this:

import { shallowMount } from '@vue/test-utils'
import MyComponent from '../MyComponent.vue'

const wrapper = shallowMount(MyComponent)

It is important to realize that shallow mounting means that the component is different from the one that actually runs in production. Therefore, this will only be appropriate for tests that focus on the independent functions of your component, and do not exercise any child components.

Lifecycle Hooks

It is important to realize that components mounted using either mount or shallowMount will not respond to all lifecycle events. Specifically, hooks defined on the beforeDestroy and destroyed events will not be triggered, until you manually destroy the component.

In addition, a component under test is not automatically destroyed at the end of a spec, and you have to manually clean up any tasks that continue to run.

Asserting Emitted Events

By default, a mounted wrapper records all the events emitted by the Vue instance. This provides useful functionality for unit testing. You can:

  • Retrieve the recorded events using the wrapper.emitted() method
  • Make assertions based on any recorded event
  • Get an Array of events in chronological order using the wrapper.emittedByOrder() method

Related content: Read our guide to unit testing best practices

Vue.js Security Unit Testing with Bright

Bright is a developer-first Dynamic Application Security Testing (DAST) scanner, the first of its kind to integrate into unit testing, revolutionizing the ability to shift security testing even further left. You can now start to test every component / function at the speed of unit tests, baking security testing across development and CI/CD pipelines to minimize security and technical debt, by scanning early and often, spearheaded by developers. With NO false positives, start trusting your scanner when testing your applications and APIs (SOAP, REST, GraphQL), built for modern technologies and architectures. Sign up now for a free account and read our docs to learn more.

Unit Testing in Javascript: DIY vs. Test Framework

What is Unit Testing in Javascript?

JavaScript unit testing allows you to test small, self-contained units of JavaScript code, which are part of a web page or web application. There are two key concepts in JavaScript unit testing:

  • Test framework—can import some JavaScript code, invoke it, and test if it works properly. 
  • Test case—a specific test that checks if a unit of code is working properly. Tests are organized into test suites. 
  • Test runner—runs test cases in the browser to see how the unit under test behaves.

Popular JavaScript unit testing frameworks include Jest, Mocha, and Jasmine. We’ll show how to run a simple unit test without a full framework, and how to test your code using Jest.

In this article:

Quick Tutorial #1: JavaScript Unit Testing Without a Framework [DIY]

While there are many JavaScript unit testing frameworks, it is useful to build a unit test yourself, without any framework, to get a good grasp of the mechanisms involved. Our discussion below is based on the excellent tutorial by Amit Gupta.

Step 1: Create simple test framework

Create a test.js file and implement the it function. 

In test frameworks like Jasmine, the it function allows you to run a piece of code, observe its output, and see if it matches the expected output. Here we will implement this function ourselves. It takes two parameters:

  • desc—description of the test case
  • fn—function to test

Here is the code:

(function(){
  'use strict';

   function it(desc, fn) {
    try {
      fn();
      console.log(desc);
    } catch (error) {
      console.log('n');
      console.log(desc);
      console.error(error);
    }
  }
})();

Add a simple test assertion. This assertion checks if an expression is true, and if not, throws an error:

 function assert(isTrue) {
    if (!isTrue) {
      throw new Error();
    }
  }

Step 2: Create test runner

Next, we’ll create a test.html file which will be our test runner. All it does is run test.js.


  Test Runner


Step 3: Running a test

In the test.js file, we’ll add the following test:

it('should fail', function() {
  assert(1 !== 1);
});

Because 1 is equal to 1, this test will always fail. To see that our assertion works properly, run test.html in your Chrome browser, open Developer Tools and switch to the Console tab. You should see the message should fail and immediately after it, an error. In a real test, this will allow you to see what caused the code to fail and debug the issue.

Now add the following test, which should always pass:

it('should pass', function() {
  assert(1 === 1);
});

Refresh the test runner in the browser, and look at the console. It will show the message should pass.

Related content: Read our guide to unit testing examples

Quick Tutorial #2: JavaScript Unit Testing Tutorial with Jest

Jest is an open-source JavaScript-based testing framework primarily used for React and React Native-based web applications. It can be difficult to run unit tests in a software front end, due to complex, time-consuming configuration. The Jest framework can greatly reduce this complexity.

Jest also provides a package assertion library, a test runner, and a built-in mock library. It can be used with a variety of JavaScript frameworks including Angular, Vue.js, Node.js, Babel, and TypeScript. Apart from unit testing you can also use Jest to: 

  • Validate almost anything against JavaScript, especially browser rendering of web applications. 
  • Run automated browser testing.

Related content: Read our guide to unit testing frameworks (coming soon)

Let’s see how to run a simple unit test with Jest.

Step 1: Set Up the Environment

To set up a simple test environment, create a new project using npm init -y and install Jest as a development dependency for npm:

npm install --save-dev jest

Add this script to package.json to be able to run your tests from the command line:

"scripts": {
  "test": "jest"
}

Step 2: Create Sample File

Create a new file under src/example.js and set it to export the function:

function example(a, b) {
  return a + b;
}

module.exports = example;

Learn more in our detailed guide to unit testing best practices.

Step 3: Create a Test File

Save this file and open test/example.js. Jest automatically finds the test you want to run in the test/ directory. This file serves as a companion to the example.js file and defines a set of tests to verify that all functions are working correctly. 

A basic Jest test looks like this:

test('Description', () => {
  expect(functionName(args)).toBe(result);
});

By default, the test() function wraps all the code in the test. Each expect() block calls a function (a unit) and passes its value to a “matcher”. In this case, the matcher is a toBe() function that checks for equality.

Jest has a variety of matchers, all of which you can read about in the documentation.

Step 4: Try a Test on the Example Function

The following block runs two basic tests on our example function:

const example = require('../src/example');

test('testing simple additions', () => {
  expect(doSomeMath(1, 1)).toBe(2);
  expect(doSomeMath(2, 2)).toBe(4);
});

Step 5: Run the Test

To execute your test, run this command:

npm run test

This will run all test suites and print the results of each test suite.

If the math works, everything should pass. If it fails, Jest will provide a detailed description of the problem and help track it down.

Step 6: Use a Loop to Test Multiple Values

Here is how to use a for loop to call expect multiple times by iterating over the input. If the expected execution fails, the test itself also fails:

test('checking multiple addition values', () => {
  for (let a = 1; a < 10; a++) {
   expect(doSomeMath(a, 5)).toBe(a + 5)
  }
});

Related content: Read our guide to unit testing in angular.

Security Unit Testing with Bright

Bright is a developer-first Dynamic Application Security Testing (DAST) scanner, the first of its kind to integrate into unit testing, revolutionizing the ability to shift security testing even further left. You can now start to test every component / function at the speed of unit tests, baking security testing across development and CI/CD pipelines to minimize security and technical debt, by scanning early and often, spearheaded by developers. With NO false positives, start trusting your scanner when testing your applications and APIs (SOAP, REST, GraphQL), built for modern technologies and architectures. Sign up now for a free account and read our docs to learn more.

OWASP Top 10 Risks and How to Prevent Them

What is the OWASP Top 10?

The Open Web Application Security Project (OWASP) is a non-profit organization that strives to improve web application security by offering research and free resources. The organization provides easily accessible materials on its website to make it possible for anyone to improve the security of their web applications. 

The organization offers a wealth of information through documentation, videos, forums, and tools. The OWASP Top 10 is a popular project that provides information about web application security risks. It serves development teams worldwide as a standard for securing web applications. 

The organization published the first version of the list in 2003 and updated it in 2004, 2007, 2010, 2013, and 2017. The latest update was published in 2021.

In this article:

How Should You Use the OWASP Top 10 List?

The OWASP Top 10 list was introduced in 2003 and is updated every few years in line with the evolution of application security threats and practices. The importance of this list lies in the highly practical information it provides, in the sharp focus it offers developers and organizations of all sizes (by prioritizing the most important threats), and as a standard for anyone developing and delivering web applications.

Many security auditors treat the OWASP Top 10 as a basic threshold of application security. Failure to secure applications against one or more of the Top 10 indicates that the organization does not have basic security measures and may not meet other compliance requirements. 

On the other hand, by incorporating the Top 10 risks into the software development lifecycle (SDLC), an organization demonstrates its commitment to security best practices. Securing applications against the OWASP Top 10 is not enough to comprehensively secure applications, because there are many other threats, but it is a big step towards sound application security.

Here are a few important points that can help you make use of the OWASP list and research:

  • Address the most serious threats—the OWASP Top 10 focuses on the most severe threats, not specific vulnerabilities. Threats are always a more reliable measure of risk because they help you consider possible attack vectors, which can strike in many different places in your application.
  • Keep up with changes—OWASP updates the Top 10 list every three years, making recommendations that reflect important, long-term changes in the application security field and do not reflect short-term volatility.
  • Get detailed technical information—behind each of the OWASP Top 10 items is a wealth of technical information that can help you better understand the risk, learn about development antipatterns that can lead to vulnerabilities, and remediate them. OWASP also provides open source tools you can use to test software packages and identify security issues.

Learn more in our detailed guide to owasp mobile top 10.

OWASP Top 10 2021

A01: Broken Access Control

Ideally, web applications should make each piece of information available only to certain users according to their privileges. Broken access control can lead to critical security risks, allowing users to access the information they are not truly authorized to access.

How to prevent broken access control:

  • Set up and implement a secure development lifecycle that includes designing and evaluating security and privacy controls. 
  • Set up and implement a library of secure design patterns.
  • Employ threat modeling for critical access control, authentication, key flows, and business logic.
  • Integrate security controls into user stories.
  • Add plausibility checks to each application tier, from front-end to back-end.
  • Depending on the required exposure and protection, segregate tier layers on the system and network layers.

A02: Cryptographic Failures

Cryptographic failures occur when cryptographic methods do not protect data appropriately. Common cryptographic control issues include poorly implemented cryptographic protocols and obsolete cryptographic ciphers.

In the past, this category of web security risks was called ‘sensitive data exposure’. OWASP changed the category’s name to emphasize the seriousness of cryptographic failures and the dangerous role they play in exposing sensitive information.

How to prevent cryptographic failures:

  • Turn off autocomplete on any form that collects data and disable caching on these forms.
  • Minimize the data surface area.
  • Encrypt your data in transit as well as at rest.
  • Implement only the most updated encryption techniques.
  • Set up and enforce strong adaptive and salted hashing functions for passwords.

A03: Injection

Injection vulnerabilities allow threat actors to insert malicious data into an application. The injection may include malicious commands that redirect stored data to a malicious website or force changes to the application. 

The list mentions SQLi injection as a common attack vector. You can remediate this risk by explicitly authenticating all untrusted data, particularly data submitted by your end-users. In 2021, the OWASP updated this category to include cross-site scripting (XSS).

How to prevent injection attacks:

  • Segregate commands from data—this technique can help prevent attacks that replace data with unauthorized command execution. 
  • Code SQL queries with parameters—instead of structuring a command only from user input content, use parameterized queries (also called prepared statements).
  • Eliminate the interpreter—you can use a safe API to eliminate the interpreter.
  • Implement positive server-side validation—use this technique with an intrusion detection system to identify suspicious client-side behaviors.

A04: Insecure Design

Design flaws can introduce critical threats to your web application. They are caused by an insecure design that does not include threat modeling, reference architectures, or secure design principles and patterns. Failure to assess the business risks inherent in the system being developed can also cause design flaws. 

How to avoid design flaws:

  • A secure development lifecycle—set up and enforce a lifecycle that includes security in the design of the software and all development phases.
  • A library of secure design patterns—set up a library and use it consistently to standardize security.
  • Threat modeling—implement threat modeling for critical access control, authentication, key flows, and business logic.
  • User stories—use security controls for all user stories.
  • Plausibility checks—include these checks for each application tier, from front-end to back-end.
  • Segregate tier layers—implement segregation for the system and network layers according to your project’s exposure and protection needs.

A05: Security Misconfiguration

Security misconfigurations occur when issues in the application’s configurations allow unauthorized access, usage, modification, and data exfiltration. For example, applications that incorrectly filter incoming packets may allow unauthorized use of a default user ID or password. In 2021, OWASP added EML external entities (XXE) vulnerabilities to this category.

How to avoid security misconfigurations:

  • Implement a repeatable hardening process—this process can help you quickly deploy an appropriately locked down environment. Ideally, you should configure all environments identically—including development, testing, and production—but with different credentials.
  • Use a minimal design—do not add unnecessary components, features, samples, or documentation. If you find any redundancies, remove these unused features and frameworks.
  • Set up a patch management process—this process should include configuration reviews followed by updates and fixes. 
  • Configure a segmented application architecture—use this to isolate components or tenants to ensure threats are contained to the location of initial intrusion. You can use various techniques, including containerization, segmentation, and cloud security groups.
  • Automated your processes—automation helps drive efficiencies and reduce the scope of human error. You can use automation to verify the effectiveness of your configurations and settings across all environments.

A06: Vulnerable and Outdated Components

This category refers to unsupported, out-of-date, and vulnerable software components, including direct and indirect dependencies. Using these components without regular scanning and testing mechanisms can introduce critical risks. In the past, this category was called ‘Using Components with Known Vulnerabilities’. It was updated to include outdated components.

How to avoid using vulnerable and outdated components:

  • Remove redundancies—including unused dependencies and any unnecessary features, files, documentation, and components.
  • Check your versions—you must continuously inventory all used versions of server-side and client-side components as well as their dependencies. You can use tools like OWASP Dependency Check and retire.js. 
  • Scan for vulnerabilities—you should continuously monitor various sources, such as the National Vulnerability Database (NVD), for known vulnerabilities in your software. You can employ software composition analysis (SCA) tools to automate this process. 
  • Use official sources—obtain components only from official sources and use secure links. Ideally, you should use signed packages to avoid including a modified, malicious component.
  • Monitor for activity—do not use libraries and components that are no longer maintained or do not provide security patches for older versions. If it is impossible to patch, deploy a virtual patch to monitor, detect, and protect against these issues.

A07: Identification and Authentication Failures

This category includes vulnerabilities caused by identification and authentication failures. These failures allow attackers to launch brute force attacks and credential stuffing. Common vulnerabilities include a lack of multi-factor authentication (MFA) and no user-session validation for inactive or expired sessions. 

This category was introduced in 2017 under the name ‘broken authentication’. In 2021, OWASP updated the category and renamed it to include broken session management and broken authentication.

How to prevent broken authentication and identification:

  • Implement MFA and enforce strong passwords.
  • Never deploy using default credentials and constantly monitor all failed login attempts.
  • Employ a secure session manager to generate time-limited, random session IDs. Do not include session IDs in URLs.

A08: Software and Data Integrity Failures

This category includes assumptions made regarding software updates, CI/CD pipelines, and critical data without verifying integrity. Additionally, the category mentions insecure deserialization, which occurs when applications do not deserialize vulnerable objects. Threat actors can manipulate data received by back-end code to launch attacks.

How to avoid software and data integrity failures:

  • Digital signatures—mechanisms like digital signatures can verify the data or software originates from an expected, trusted source and was not altered.
  • Trusted repositories—your libraries and dependencies should consume trusted repositories like Maven or npm. You can also host an internal, vetted repository.
  • A review process—use a review process for all code and configuration changes to reduce the probability of malicious code or configuration added to the pipeline.
  • Integrity—CI/CD pipelines require proper segregation, access control, and configuration to ensure the integrity of any code moving through build and deploy stages.

A09: Security Logging and Monitoring Failures

This category was previously referred to as ‘insufficient logging and monitoring’. It covers vulnerabilities related to security monitoring and logging failures, which can lead to errors in your ability to identify, escalate, and respond to active breaches. Logging and monitoring are crucial mechanisms to detect breaches. These failures impact visibility, forensics, and incident alerting. 

How to prevent security logging and monitoring failures:

  • Context—you should log all failures related to login, server-side input validation, and access control with sufficient user context. This context is key to helping you identify suspicious accounts and perform accurate forensic analysis.
  • Format—ideally, your set up logging so that the system generates logs in a format your log management solutions can consume easily.
  • Encoding—you can prevent injections and attacks on your logging and monitoring systems by ensuring log data is properly encoded.
  • Audit trails—you should set up an audit trail with integrity controls, such as append-only database tables, for high-value transactions. It can help you prevent deletion and tampering.

A10: Server-Side Request Forgery

Server-side request forgery (SSRF) vulnerabilities allow threat actors to force a server-side application to send HTTP requests to domains chosen by the actor. It occurs when a web application fetches remote resources without validating user-supplied URLs. It can occur even if you use a firewall or VPN because threat actors can still force the application to send a forged request to an unauthorized location.

Related content: Read our guide to owasp zap.

How to prevent SSRF:

  • Enforce network access control rules or firewall policies that deny by default—to allow only essential intranet traffic.
  • Always validate and sanitize client-supplied input data.
  • Use a positive allow list to enforce the URL schema, port, and destination.
  • Disable HTTP redirections and never send raw responses to clients.
  • Reduce the impact of SSRF attacks by segmenting remote resource access functionality in separate networks.

Other OWASP Top 10 Lists

In addition to the OWASP Top 10 Application Security Vulnerabilities list, covered in this article, OWASP has released two other important lists that can help you secure mobile applications and APIs. Learn about them in our detailed guides:

  • OWASP Mobile Top 10 (coming soon)
  • OWASP API Top 10 (coming soon)

Are These the Only Vulnerabilities You Need to Watch Out For?

The OWASP Top 10 is a great resource for web developers and security professionals. It provides a solid foundation and highlights key issues observed in production web applications. However, it is not a good idea to build an entire application security program on these 10 issues, for several reasons. 

Threats not covered in the OWASP Top 10

There are many other types of vulnerabilities and techniques that can be used to break into applications and steal data. 

For example, Cross-Site Request Forgery (CSRF) was removed from the 2017 OWASP Top 10 list, because it is a less significant threat in the current technology environment. This doesn’t mean you don’t need CSRF protection—it only means that most organizations and frameworks already protect themselves, so OWASP considers it a less severe risk.

Rapid evolution of appsec technology and threats

Another concern is the rapid evolution of web application technology, and rising new threats. Because OWASP Top 10 is updated only once every three years, it does not reflect the latest technologies, newly discovered vulnerabilities, and the latest tactics, techniques, and procedures (TTP) used by attackers. 

The need for comprehensive security testing

Automated security tools can help you scan software projects for vulnerabilities and security weaknesses, including but not limited to the OWASP Top 10 risks. This is critical to ensuring that you did not miss an important vulnerability that was not included in the Top 10, but can still pose a risk to your application and business. 

Find Out if Your App is Exposed to OWASP Top 10 with Bright Security

Bright Security is a developer-first Dynamic Application Security Testing (DAST) scanner that can test your applications and APIs (SOAP, REST, GraphQL), enabling you to bake security testing into your development and CI/CD pipelines. 

Detect the OWASP (API) Top 10, MITRE 25 and more, including Business Logic Vulnerabilities. You can easily reduce your security and technical debt by scanning early and often, on every build, to be secure by design. 

With NO false positives, there is no need for manual validation of security findings, removing costly and time consuming human bottlenecks that cripple your rapid releases and drain your security team’s limited resources. 

Detect OWASP Top 10 security vulnerabilities in your apps and APIs for FREE: Register for a Bright account!

Unit Testing in Angular: The Basics and a Quick Tutorial

What Is Unit Testing in Angular?

Angular is an application design framework and development platform for creating complex, high performance single page applications.

Angular unit tests help you test a specific unit of Angular code in isolation. Angular unit tests isolate parts of your code to reveal problems like bad logic, coding errors, or malfunctioning features. 

Unit testing can be difficult to achieve for complex projects with poor separation of concerns. However, Angular allows you to write code in such a way that it can be easy to individually test each piece of functionality in your application. If you plan for unit testing in advance and follow Angular coding best practices, it should be straightforward to add unit tests to your applications.

In this article:

Why Should You Unit Test Angular Apps?

Angular unit tests allow you to test your application for coding errors and unexpected user behavior. Testing all possible behaviors can be tedious and inefficient, but generating tests for each coupling block in your application will help identify problems with each block.

One of the easiest ways to test the strength of a block is to create a test for each block. You should do this proactively, and not wait for a bug to surface in production. Create unit tests for blocks (components, services, etc.) to easily detect bugs and fix them earlier in the development process.

Learn more in our detailed guide to unit testing vs integration testing.

Basics of Angular Component Testing

Angular component testing involves checking the performance and quality of application components. You can perform Angular component tests manually by running the application to see if the components behave as expected. However, manual testing is time-consuming and impractical for large, complex web applications. You’ll most likely need to find a better way to test Angular components. 

Angular projects using the Angular CLI come with Jasmine and Karma to simplify and automate the testing process. Jasmine is a behavior-based testing framework you can use to write unit tests. You can then run the tests on Karma to verify if individual application parts are functioning correctly. The unit tests pass if the code functions correctly and fail if it contains a bug.

The test files should use the name.component.spec.ts naming convention. Keeping them with the other files associated with the same component is best. If you built your Angular app using the Angular CLI, you might have seen the app.component.spec.ts file – this file has unit tests for the core AppComponent. When you run tests with the Angular CLI, you run all the unit tests in the *.spec.ts files.

You can use the ng test command in the terminal to run tests with the Angular CLI. It will trigger Karma to open the default browser to run the tests you wrote using Jasmine and display the test outcomes.

Here are some of the basic functions in Jasmine:

  • describe(string, function) – takes a title and function containing one or multiple specs. It is also called a test suite.
  • it(string, function) – takes a title and function that contains one or multiple expectations. It is also called specs.
  • expect(actual) – takes a value known as an actual. Typically, you use expect functions alongside matcher functions. They work together to return boolean values depicting a spec’s passing or failing.
  • Matcher – takes a value representing the expected value. Matcher function are chained to expect functions. Examples of matchers include toBeTruthy(), toContain(), and toEqual().

Related content: Read our guide to unit testing best practices

Quick Tutorial: How to Code an Angular Unit Test

An Angular unit test is based on a describe container, which has several different blocks such as it, beforeEach, and xit. The beforeEach block always runs first. Other blocks do not depend on each other and may run in any order. Almost all unit tests use two utilities called TestBed and async.

The beforeEach block declares an application component that should run in the testing environment. Here is an example of a beforeEach block. Note that the compileComponents() function might not be needed if you are using webpack.

beforeEach(async(() => {
   TestBed.configureTestingModule({
      declarations: [
         MyComponent
      ],
   }).compileComponents();
}));

A first step in a unit test is to verify that an instance of the application component is successfully created. See the code below – the property fixture.debugElement.componentInstance generates an instance of your component. The code tests whether the component is created using the assertion toBeTruthy :

it('component should be created', async(() => {
    const fixture = TestBed.createComponent(MyComponent);
    const app = fixture.debugElement.componentInstance;
    expect(app).toBeTruthy();
}));

Now, let’s write another code block that shows whether we have access to the properties of the component. The following test checks if the title that would appear in the browser when the component is rendered is really the correct title. Of course you would have to switch my-title for the actual title defined in the component.

it(`component should have title 'my-title'`, async(() => {
     const fixture = TestBed.createComponent(MyComponent);
     const app = fixture.debugElement.componentInstance;
     expect(app.title).toEqual('my-title');
}));

Finally, we can inspect DOM elements created by the component. Let’s check the

HTML tag generated by the component. We’ll use the detectChanges() function to simulate running in a browser environment. The fixture.debugElement.nativeElement property will give us access to an actual on-page DOM element.

it('component should render 'Welcome to My App' in h1 tag', async(() => {
   const fixture = TestBed.createComponent(MyComponent);
   fixture.detectChanges();
   const compiled = fixture.debugElement.nativeElement;
 expect(compiled.querySelector('h1').textContent).toContain('Welcome to My App!');
}));

This is a simple demonstration of how a specs.ts file can help you load an Angular application component, run it in a testing environment, and verify different aspects of the component in a simulated browser environment.

Security Unit Testing in Angular with Bright Security

Bright is a developer-first Dynamic Application Security Testing (DAST) scanner, the first of its kind to integrate into unit testing, revolutionizing the ability to shift security testing even further left. You can now start to test every component / function at the speed of unit tests, baking security testing across development and CI/CD pipelines to minimize security and technical debt, by scanning early and often, spearheaded by developers. With NO false positives, start trusting your scanner when testing your applications and APIs (SOAP, REST, GraphQL), built for modern technologies and architectures. Sign up now for a free account and read our docs to learn more.

Top 7 Unit Testing Frameworks: A Quick Comparison

What is a Unit Testing Framework?

Unit testing is a common skill among software developers—chances are you have at least some experience writing unit tests. As you scale up your unit testing, unit testing frameworks come in useful. These frameworks, most of which are open source, can help you create large test suites and execute them automatically every time you build a new version of your software.

Unit testing frameworks provide convenient utilities for building unit tests, and allow you to execute them and report on results. Unit test frameworks are not only useful for development stages. They can also be useful for software design, debugging, performance optimization, and testing stages of a software development project.

Related content: Read our guide to cypress testing.

This is part of an extensive series of guides about Software Development.

Related content: Read our guide to unit testing best practices

In this article, we’ll cover the following unit testing frameworks:

  1. Jest
  2. JUnit
  3. NUnit
  4. Mocha
  5. Cypress
  6. Jasmine
  7. Storybook
  8. Testcafe
  9. Security Unit Testing with Bright Security 
  10. See Additional Guides on Key Software Development Topics

1. Jest

License: MIT License

Repo URL: https://github.com/facebook/jest 

Jest is a JavaScript framework initially developed by Meta and later released as an open source project. It is commonly used with web applications built with React and React Native. It simplifies unit testing for front-ends. Instead of wasting efforts on extensive, time-consuming configuration, you can use Jest—it requires zero configuration.

Jest can help you validate almost all JavaScript functionality, including the browser rendering of your web applications. You can also use this framework for automated browser testing. It offers a package of an assertion library, a test runner, and a built-in mocking library. Jest is ideal for testing JavaScript library projects like AngularJS, Node JS, Vue JS, TypeScript, and Babel.

2. JUnit

License: Eclipse Public License—v 2.0

Repo URL: https://github.com/junit-team/junit5 

JUnit is an open source framework you can use to write and run tests. It aims to help develop bug-free and reliable code written in Java. JUnit provides test runners that run tests and assertions to test the expected results. No need to manually check the test results—JUnit runs tests and checks the results automatically. 

JUnit displays test results interactively as a progress bar. It offers several graphs representing your test’s progress, displaying a green color when a test runs smoothly and a red color when it fails. It also provides annotations to help you identify test methods.

3. NUnit

License: MIT License

Repo URL: https://github.com/nunit/nunit 

NUnit is an open source framework you can use to write and run tests in .NET. It provides a console runner that you can use for batch execution of tests. It also lets you use Test Adapter to run tests via Visual Studio. Alternatively, you can use third-party runners. 

You can access the console runner works via the NUnit Test Engine, which powers the runner, enabling it to explore, execute, and load tests. It can also run tests in a separate process. In this case, the engine uses the nunit-agent program to run the tests.

NUnit supports data-driven tests and multiple platforms, such as Silverlight and .NET Core. It can run tests in parallel and lets you add test cases to one or multiple categories for selective running.

4. Mocha 

License: MIT License

Repo URL: https://github.com/mochajs/mocha 

Mocha.js is a JavaScript test framework that can run in the browser and on Node.js. This open source project provides simple interfaces that let you test synchronous as well as asynchronous code. 

Mocha.js includes a default BDD interface and various other interfaces to help you define test suites, hooks, and individual tests, such as QUnit, Exports, Require, and TSS. It runs tests serially to deliver accurate and flexible reporting. You can employ this framework to map uncaught exceptions to the corresponding test cases.

Learn more in our detailed guide to mocha testing.

4. Cypress

License: MIT License

Repo URL: https://github.com/cypress-io/cypress 

Cypress is an open source tool for testing front-end web applications. It can take snapshots while your tests are running and provides readable errors and stack traces to facilitate fast debugging. Cypress has automatic waiting functionality that ensures tests wait for commands and assertions before moving forward.

Cypress provides spies, stubs, and clocks that can help you verify and control the behavior of functions, server responses, or timers. It also provides network traffic control and cross-browser testing capabilities. 

5. Jasmine 

License: MIT License

Repo URL: https://github.com/jasmine/jasmine 

Jasmine is a testing framework you can run on JavaScript-enabled platforms without intruding on the IDE or application. This open source framework provides easy-to-read syntax and a library that includes all components needed to test your code. 

You can use Jasmine in the browser and also for Node, Ruby, and Python. It is fast, provides a straightforward and rich API, and lets you use natural language to describe your test and its expected results.

6. Storybook

License: MIT License

Repo URL: https://github.com/storybookjs/storybook 

Storybook is a tool that lets you build and test user interfaces (UI). It provides an environment that enables you to test components in isolation. In this environment, a story is a way to explore a component in numerous variations and complexities. Storybook provides a test runner and integrations with the JavaScript ecosystem to help expand your UI test coverage. 

The test runner can automatically test an entire Storybook and catch broken stories. The visual test functionality captures a screenshot of each story and compares them against baselines to identify integration and appearance issues. You can use accessibility tests to identify usability issues related to hearing, visual, mobility, speech, neurological, or cognitive disabilities and interaction tests to verify component functionality.

7. Testcafe

License: MIT License

Repo URL: https://github.com/DevExpress/testcafe 

Test Cafe is an open source Node.js automation tool for testing web applications. You can install it with a single command and run it on various environments, including Linux, Windows, and macOS. There is no need for plugins or external libraries.

Test Cafe lets you write scripts in JavaScript TypeScript. You can run tests on any browser—there is no need to download separate drivers for each browser. It provides a built-in waiting mechanism and can run tests on mobile devices and remote computers.

Security Unit Testing with Bright Security 

Bright is a developer-first Dynamic Application Security Testing (DAST) scanner, the first of its kind to integrate into unit testing, revolutionizing the ability to shift security testing even further left. You can now start to test every component / function at the speed of unit tests, baking security testing across development and CI/CD pipelines to minimize security and technical debt, by scanning early and often, spearheaded by developers. With NO false positives, start trusting your scanner when testing your applications and APIs (SOAP, REST, GraphQL), built for modern technologies and architectures.

See Additional Guides on Key Software Development Topics

Together with our content partners, we have authored in-depth guides on several other topics that can also be useful as you explore the world of software development.

Technical Documentation

Authored by Swimm

Code Documentation

Authored by Swimm

Gitlab CI

Authored by Codefresh